

Instagram Outage: Instagram users faced an unexpected disruption early Sunday as the Meta-owned platform suffered a brief outage, mainly affecting users in the United States. According to outage-tracking website Downdetector, complaints peaked around 4:10 a.m. EST, when more than 180 users reported problems accessing the popular photo and video-sharing app. Several users said they were unable to log in or load content during the outage. Frustrated users took to other social media platforms to share screenshots of the issue, which showed a blank screen with a circular refresh icon and no clear error message. Instagram Outage: Downdetector Data Add Zee News as a Preferred Source Downdetector data showed that 45 per cent of affected users reported app-related issues, while 41 per cent faced login problems. Another 14 per cent said their feed or timeline was not loading properly. The outage appeared to have a limited impact in India. According to Downdetector, only about 10 users in the country reported issues accessing Instagram, suggesting the problem was largely confined to certain regions. Meta Official Statement Awaited Meta has not issued any official statement explaining the reason behind the outage or how long the disruption lasted. As Instagram went down, social media platforms were quickly flooded with user reactions. One user asked, “Is Insta down?” while another joked, “Jimin really got that Insta baddie aesthetic down.” Netizens Reaction #instagramdown is this happening to anyone else ?? pic.twitter.com/nUZ8fjP9EV (@xoxolillyy_) December 28, 2025 Ilhan Omar’s daughter posted on Instagram, wishing death to the “colonial empire from LA to Rafah.” She’s just saying what Ilhan’s too scared to admit: they hate the United States and want to burn it down—and they’re not even hiding it anymore. pic.twitter.com/RmfpgpH6SZ — Eyal Yakoby (@EYakoby) December 27, 2025 Instagram down? Unable to upload, keeps getting stuck and repeating the cycle.. worse when you’ve got deadlines ffs pic.twitter.com/6zGY0PJvr9 — J.E. (@JackEmson99) December 24, 2025 Yes. It has happened again. Instagram is down. And now everyone is on twitter. #instagramdown pic.twitter.com/n7lM4SI6Xv — Amit. (@iiamitverma) February 26, 2025 This is not the first time a Meta-owned platform has faced technical issues. Earlier this year, WhatsApp experienced multiple outages that affected users worldwide, including in India. In one such incident in September, thousands of users were unable to send messages or upload status updates, leading to widespread complaints across social media. (With IANS Inputs)
The Real Cost of Inaction: How Silos Hurt Productivity for Data Scientists (Sponsored)
The Real Cost of Inaction: How Silos Hurt Productivity for Data Scientists (Sponsored)

Google Chrome Extension For Cryptocurrency Binance-Owned Trust Wallet Hacked; Users Lose Rs 58,00,00,000; Here’s How to Ensure Security And Stay Safe | Technology News
Google Chrome Extension Hacked: A malicious security breach hit Binance-owned Trust Wallet. Hackers stole more than $7 million (approx Rs 58,00,00,000) by draining funds from some user wallets. The problem was linked to Trust Wallet’s Google Chrome extension. After the incident, Binance co-founder Changpeng Zhao said that affected users will get their money back. He shared this update on social media platform X (formerly Twitter) and said the company will step in to limit the damage. However, two days later on Saturday, Trust Wallet CEO Eowyn Chen shared a detailed update on X (formerly Twitter). She explained how the incident happened, the steps taken to stop the attack, and what the company has learned so far from its investigation. Trust Wallet Breach Affected Only Select Users Add Zee News as a Preferred Source According to Trust Wallet CEO Eowyn Chen, the investigation has found that the security issue only affected users who opened and logged into Trust Wallet’s Browser Extension version 2.68. Adding further, she also noted that the breach does not affect any mobile app users, any other versions of browser extension users, as well as extension v2.68 users who opened and logged in after 26 December, 11:00 UTC. Hence, all these users remain unaffected by the incident and their accounts, data, and assets are considered secure. Trust Wallet Breach Affected: What Steps Company Has Taken To limit the impact of the incident, the company has taken a few steps. The harmful website linked to the attack has been reported to the domain registrar, NiceNIC, and has now been blocked. This means users who are still using Extension version 2.68 are safe from any further loss. The company has also stopped all new releases by closing its release APIs for the next two weeks. At the same time, Trust Wallet has started collecting reports from affected users and is working on refunds. Some parts of the refund process are still being worked out. Trust Wallet Breach: How To Ensure Security And Stay Safe Step 1: Do not open the Trust Wallet Browser Extension on your desktop to keep your wallet safe and avoid further risks. Step 2: Open Chrome Extensions by pasting this link into your browser’s address bar: chrome://extensions/?id=egjidjbpglichdcondbcbdnbeeppgdph. Step 3: Find Trust Wallet and turn the toggle Off if it is still enabled. Step 4: Enable Developer mode by clicking the option in the top-right corner of the page. Step 5: Click the Update button that appears in the top-left corner to refresh the extension. Step 6: Check the extension version and make sure it shows version 2.69, which is the latest and secure version.

AI Deepfakes, Bot Networks And Digital Warfare: Pakistan-Linked Accounts Are Weaponising AI Against India To Spark Communal Tensions | Technology News
AI-Generated Deepfakes: Dozens of AI‑generated videos and images pushed by accounts linked to Pakistan’s security establishment have flooded the country’s social media in recent months, aimed at inflaming communal tensions and spreading false narratives against India, according to a media report. The International Business Times report said that journalists and analysts found many viral posts came from X accounts tied to Pakistan’s military and intelligence establishment. Fact‑checkers have debunked manipulated clips that mimic news formats but exhibit uncanny audiovisual glitches, repetitive eye movements, clipped speech, and misaligned lip‑sync. “The trend is troubling for regional stability and for Pakistan’s own information ecosystem—and countermeasures will require international vigilance to stop Pakistan from spreading mass disinformation on social media,” the report said. Examples include an AI-generated clip showing IAF chief, Air Chief Marshal A.P. Singh, criticising India’s Tejas fighter and a clip attributed to former Indian Army chief V.P. Malik spouting fake communal rhetoric. An alleged circulator of such videos, ‘PakVocals’ account was followed by Pakistan’s Information and Broadcasting Minister, Ataullah Tarar, suggesting high-level interest or endorsement from the country’s top leadership, the report said. Add Zee News as a Preferred Source Further, the coordination style, including rapid deletions after posts and networks amplifying one another, resembles a managed influence operation more than that of random amateurs. In media statements and press briefings, Pakistani officials have acknowledged an “organised disinformation” problem even as they publicly target others for it, it added. Even international conflicts have been warped in this Pakistan-led disinformation campaign. Examples include the Israel-Iran war in 2025, when several Pakistani news outlets aired an AI tampered video of an Israeli studio supposedly invaded, not realising the footage was entirely fake. Similarly, the AI-manipulated videos of Indian journalist Palki Sharma Upadhyay are circulating in Pakistani social media networks. These fake clips showed her promoting Indian government-backed financial investment platforms or questioning diplomatic protocols for Prime Minister Narendra Modi’s visit to Jordan, the report said.
3 Subtle Ways Data Leakage Can Ruin Your Models (and How to Prevent It)
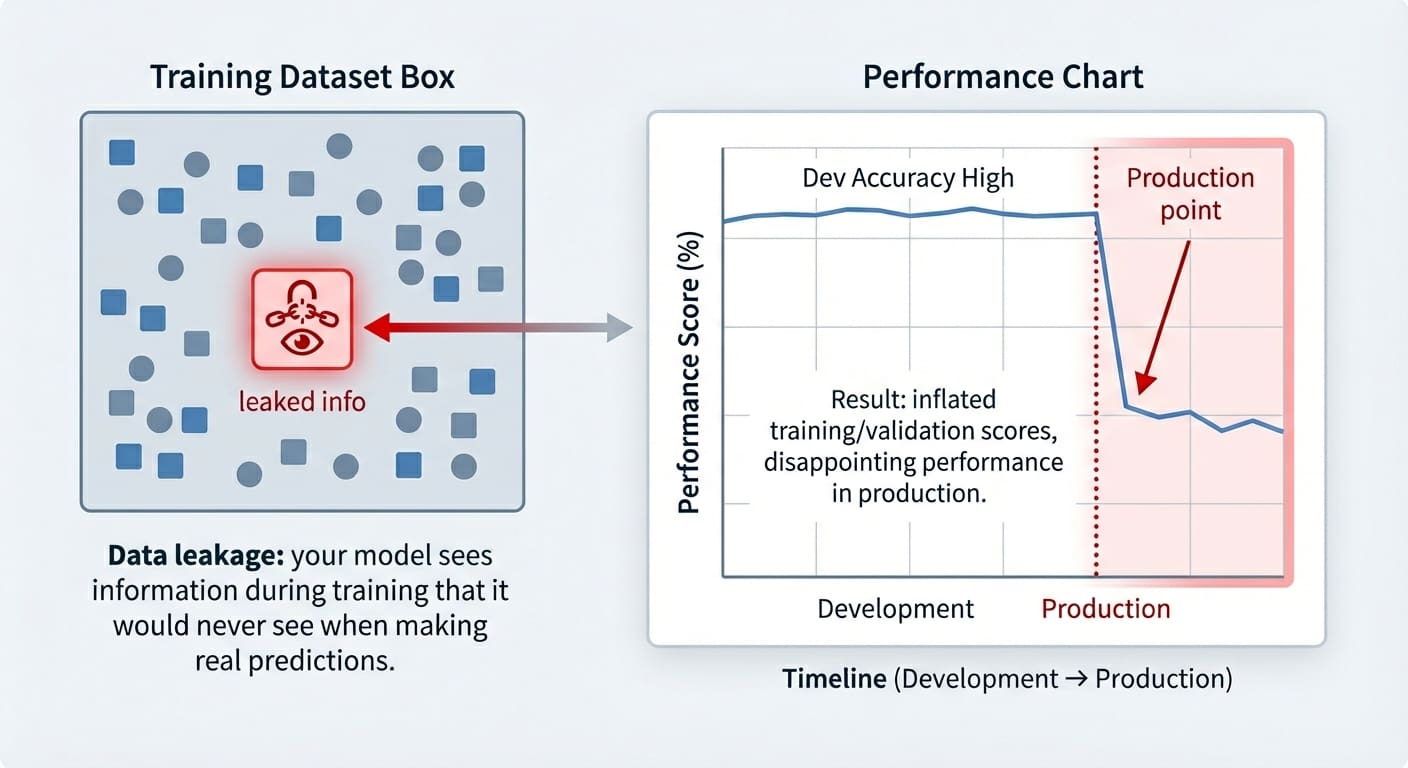
In this article, you will learn what data leakage is, how it silently inflates model performance, and practical patterns for preventing it across common workflows. Topics we will cover include: Identifying target leakage and removing target-derived features. Preventing train–test contamination by ordering preprocessing correctly. Avoiding temporal leakage in time series with proper feature design and splits. Let’s get started. 3 Subtle Ways Data Leakage Can Ruin Your Models (and How to Prevent It)Image by Editor Introduction Data leakage is an often accidental problem that may happen in machine learning modeling. It happens when the data used for training contains information that “shouldn’t be known” at this stage — i.e. this information has leaked and become an “intruder” within the training set. As a result, the trained model has gained a sort of unfair advantage, but only in the very short run: it might perform suspiciously well on the training examples themselves (and validation ones, at most), but it later performs pretty poorly on future unseen data. This article shows three practical machine learning scenarios in which data leakage may happen, highlighting how it affects trained models, and showcasing strategies to prevent this issue in each scenario. The data leakage scenarios covered are: Target leakage Train-test split contamination Temporal leakage in time series data Data Leakage vs. Overfitting Even though data leakage and overfitting can produce similar-looking results, they are different problems. Overfitting arises when a model memorizes overly specific patterns from the training set, but the model is not necessarily receiving any illegitimate information it shouldn’t know at the training stage — it is just learning excessively from the training data. Data leakage, by contrast, occurs when the model is exposed to information it should not have during training. Moreover, while overfitting typically arises as a poorly generalizing model on the validation set, the consequences of data leakage may only surface at a later stage, sometimes already in production when the model receives truly unseen data. Data leakage vs. overfittingImage by Editor Let’s take a closer look at 3 specific data leakage scenarios. Scenario 1: Target Leakage Target leakage occurs when features contain information that directly or indirectly reveals the target variable. Sometimes this can be the result of a wrongly applied feature engineering process in which target-derived features have been introduced in the dataset. Passing training data containing such features to a model is comparable to a student cheating on an exam: part of the answers they should come up with by themselves has been provided to them. The examples in this article use scikit-learn, Pandas, and NumPy. Let’s see an example of how this problem may arise when training a dataset to predict diabetes. To do so, we will intentionally incorporate a predictor feature derived from the target variable, ‘target’ (of course, this issue in practice tends to happen by accident, but we are injecting it on purpose in this example to illustrate how the problem manifests!): from sklearn.datasets import load_diabetes import pandas as pd import numpy as np from sklearn.linear_model import LogisticRegression from sklearn.model_selection import train_test_split X, y = load_diabetes(return_X_y=True, as_frame=True) df = X.copy() df[‘target’] = (y > y.median()).astype(int) # Binary outcome # Add leaky feature: related to the target but with some random noise df[‘leaky_feature’] = df[‘target’] + np.random.normal(0, 0.5, size=len(df)) # Train and test model with leaky feature X_leaky = df.drop(columns=[‘target’]) y = df[‘target’] X_train, X_test, y_train, y_test = train_test_split(X_leaky, y, random_state=0, stratify=y) clf = LogisticRegression(max_iter=1000).fit(X_train, y_train) print(“Test accuracy with leakage:”, clf.score(X_test, y_test)) 1 2 3 4 5 6 7 8 9 10 11 12 13 14 15 16 17 18 19 20 from sklearn.datasets import load_diabetes import pandas as pd import numpy as np from sklearn.linear_model import LogisticRegression from sklearn.model_selection import train_test_split X, y = load_diabetes(return_X_y=True, as_frame=True) df = X.copy() df[‘target’] = (y > y.median()).astype(int) # Binary outcome # Add leaky feature: related to the target but with some random noise df[‘leaky_feature’] = df[‘target’] + np.random.normal(0, 0.5, size=len(df)) # Train and test model with leaky feature X_leaky = df.drop(columns=[‘target’]) y = df[‘target’] X_train, X_test, y_train, y_test = train_test_split(X_leaky, y, random_state=0, stratify=y) clf = LogisticRegression(max_iter=1000).fit(X_train, y_train) print(“Test accuracy with leakage:”, clf.score(X_test, y_test)) Now, to compare accuracy results on the test set without the “leaky feature”, we will remove it and retrain the model: # Removing leaky feature and repeating the process X_clean = df.drop(columns=[‘target’, ‘leaky_feature’]) X_train, X_test, y_train, y_test = train_test_split(X_clean, y, random_state=0, stratify=y) clf = LogisticRegression(max_iter=1000).fit(X_train, y_train) print(“Test accuracy without leakage:”, clf.score(X_test, y_test)) # Removing leaky feature and repeating the process X_clean = df.drop(columns=[‘target’, ‘leaky_feature’]) X_train, X_test, y_train, y_test = train_test_split(X_clean, y, random_state=0, stratify=y) clf = LogisticRegression(max_iter=1000).fit(X_train, y_train) print(“Test accuracy without leakage:”, clf.score(X_test, y_test)) You may get a result like: Test accuracy with leakage: 0.8288288288288288 Test accuracy without leakage: 0.7477477477477478 Test accuracy with leakage: 0.8288288288288288 Test accuracy without leakage: 0.7477477477477478 Which makes us wonder: wasn’t data leakage supposed to ruin our model, as the article title suggests? In fact, it is, and this is why data leakage can be difficult to spot until it might be late: as mentioned in the introduction, the problem often manifests as inflated accuracy both in training and in validation/test sets, with the performance downfall only noticeable once the model is exposed to new, real-world data. Strategies to prevent it ideally include a combination of steps like carefully analyzing correlations between the target and the rest of the features, checking feature weights in a newly trained model and seeing if any feature has an overly large weight, and so on. Scenario 2: Train-Test Split Contamination Another very frequent data leakage scenario often arises when we don’t prepare the data in the right order, because yes, order matters in data preparation and preprocessing. Specifically, scaling the data before splitting it into training and test/validation sets can be the perfect recipe to accidentally (and very subtly) incorporate test data information — through the statistics used for scaling — into the training process. These quick code excerpts based on the popular wine dataset show

iPhone 18 Likely To Arrive In Spring 2026: Expected Price, Camera, Processor & More | Technology News
iPhone 18: Ahead of the 2026 iPhone lineup launch, leaks and reports have already started coming in. The affordable iPhone 18 model is expected to have a different launch timeline than its predecessor. Apple, a Cupertino-based tech giant, usually launches a new iPhone series in September. But that may not happen in 2026. Reports suggest that the company could launch the affordable iPhone 18 in Spring 2026. That would be a few months earlier than the usual timeline. The launch timeline of pro models will remain unchanged. Apple usually launches its new iPhone series in September. The iPhone 17 series – iPhone 17, iPhone 17 Pro, iPhone 17 Max and iPhone 17 Air – was launched in September this year. Similarly, the iPhone 16 series was also unveiled in September 2024. But this trend might change in 2026. A 9to5Mac report recently suggested that the iPhone 18 is likely to come in Spring 2026 alongside the iPhone 17e, earlier than the usual September launch. If this turns out to be true, it would mark a big shift in Apple’s launch strategy. According to the media reports, the iPhone 18 will be powered by Apple’s next-generation A20 Bionic chipset. The new processor is expected to deliver better performance and improved power efficiency compared to the A19 chip used in the iPhone 17 lineup. Camera and battery upgrades are also likely. Add Zee News as a Preferred Source Reports suggest that the front camera may move to the top-left corner of the display. Apple is also said to be testing under-display Face ID. This could reduce the size of visible sensors and free up more screen space. In terms of cameras, the iPhone 18 may continue with the 48MP main and ultra-wide sensors. However, improved image processing is expected. Apple may also offer 12GB RAM across all iPhone 18 models, including the standard version. Other possible upgrades include brighter displays, higher refresh rates and better battery life. Pricing is expected to sit slightly above the iPhone 17, which is priced at Rs 82,900 for the 256GB version. The iPhone 18 could start at somewhere between Rs 84,000 and Rs 86,000.
The Complete Guide to Using Pydantic for Validating LLM Outputs
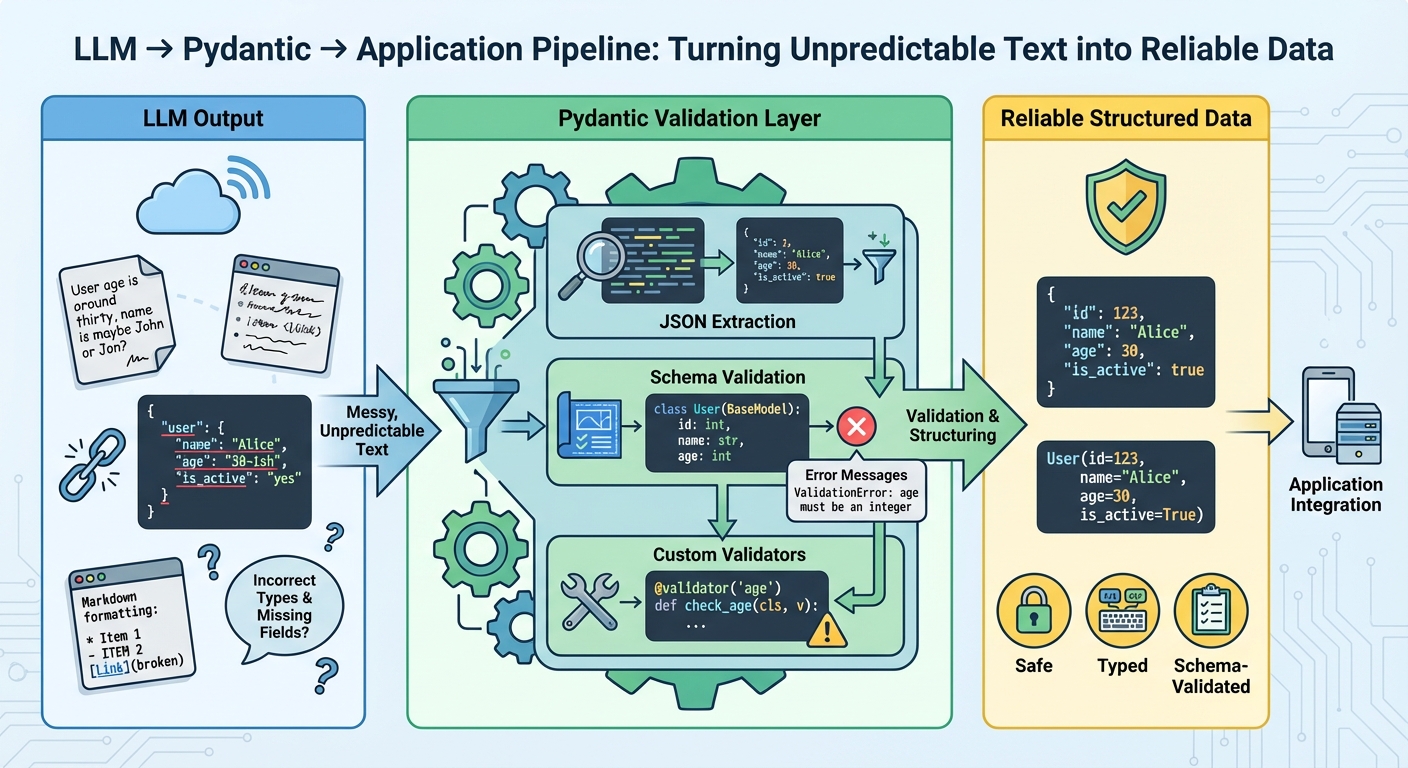
In this article, you will learn how to turn free-form large language model (LLM) text into reliable, schema-validated Python objects with Pydantic. Topics we will cover include: Designing robust Pydantic models (including custom validators and nested schemas). Parsing “messy” LLM outputs safely and surfacing precise validation errors. Integrating validation with OpenAI, LangChain, and LlamaIndex plus retry strategies. Let’s break it down. The Complete Guide to Using Pydantic for Validating LLM OutputsImage by Editor Introduction Large language models generate text, not structured data. Even when you prompt them to return structured data, they’re still generating text that looks like valid JSON. The output may have incorrect field names, missing required fields, wrong data types, or extra text wrapped around the actual data. Without validation, these inconsistencies cause runtime errors that are difficult to debug. Pydantic helps you validate data at runtime using Python type hints. It checks that LLM outputs match your expected schema, converts types automatically where possible, and provides clear error messages when validation fails. This gives you a reliable contract between the LLM’s output and your application’s requirements. This article shows you how to use Pydantic to validate LLM outputs. You’ll learn how to define validation schemas, handle malformed responses, work with nested data, integrate with LLM APIs, implement retry logic with validation feedback, and more. Let’s not waste any more time. 🔗 You can find the code on GitHub. Before you go ahead, install Pydantic version 2.x with the optional email dependencies: pip install pydantic[email]. Getting Started Let’s start with a simple example by building a tool that extracts contact information from text. The LLM reads unstructured text and returns structured data that we validate with Pydantic: from pydantic import BaseModel, EmailStr, field_validator from typing import Optional class ContactInfo(BaseModel): name: str email: EmailStr phone: Optional[str] = None company: Optional[str] = None @field_validator(‘phone’) @classmethod def validate_phone(cls, v): if v is None: return v cleaned = ”.join(filter(str.isdigit, v)) if len(cleaned) < 10: raise ValueError(‘Phone number must have at least 10 digits’) return cleaned 1 2 3 4 5 6 7 8 9 10 11 12 13 14 15 16 17 18 from pydantic import BaseModel, EmailStr, field_validator from typing import Optional class ContactInfo(BaseModel): name: str email: EmailStr phone: Optional[str] = None company: Optional[str] = None @field_validator(‘phone’) @classmethod def validate_phone(cls, v): if v is None: return v cleaned = ”.join(filter(str.isdigit, v)) if len(cleaned) < 10: raise ValueError(‘Phone number must have at least 10 digits’) return cleaned All Pydantic models inherit from BaseModel, which provides automatic validation. Type hints like name: str help Pydantic validate types at runtime. The EmailStr type validates email format without needing a custom regex. Fields marked with Optional[str] = None can be missing or null. The @field_validator decorator lets you add custom validation logic, like cleaning phone numbers and checking their length. Here’s how to use the model to validate sample LLM output: import json llm_response=””‘ { “name”: “Sarah Johnson”, “email”: “sarah.johnson@techcorp.com”, “phone”: “(555) 123-4567”, “company”: “TechCorp Industries” } ”’ data = json.loads(llm_response) contact = ContactInfo(**data) print(contact.name) print(contact.email) print(contact.model_dump()) 1 2 3 4 5 6 7 8 9 10 11 12 13 14 15 16 17 import json llm_response = ”‘ { “name”: “Sarah Johnson”, “email”: “sarah.johnson@techcorp.com”, “phone”: “(555) 123-4567”, “company”: “TechCorp Industries” } ‘” data = json.loads(llm_response) contact = ContactInfo(**data) print(contact.name) print(contact.email) print(contact.model_dump()) When you create a ContactInfo instance, Pydantic validates everything automatically. If validation fails, you get a clear error message telling you exactly what went wrong. Parsing and Validating LLM Outputs LLMs don’t always return perfect JSON. Sometimes they add markdown formatting, explanatory text, or mess up the structure. Here’s how to handle these cases: from pydantic import BaseModel, ValidationError, field_validator import json import re class ProductReview(BaseModel): product_name: str rating: int review_text: str would_recommend: bool @field_validator(‘rating’) @classmethod def validate_rating(cls, v): if not 1 <= v <= 5: raise ValueError(‘Rating must be an integer between 1 and 5′) return v def extract_json_from_llm_response(response: str) -> dict: “””Extract JSON from LLM response that might contain extra text.””” json_match = re.search(r’\{.*\}’, response, re.DOTALL) if json_match: return json.loads(json_match.group()) raise ValueError(“No JSON found in response”) def parse_review(llm_output: str) -> ProductReview: “””Safely parse and validate LLM output.””” try: data = extract_json_from_llm_response(llm_output) review = ProductReview(**data) return review except json.JSONDecodeError as e: print(f”JSON parsing error: {e}”) raise except ValidationError as e: print(f”Validation error: {e}”) raise except Exception as e: print(f”Unexpected error: {e}”) raise 1 2 3 4 5 6 7 8 9 10 11 12 13 14 15 16 17 18 19 20 21 22 23 24 25 26 27 28 29 30 31 32 33 34 35 36 37 38 39 from pydantic import BaseModel, ValidationError, field_validator import json import re class ProductReview(BaseModel): product_name: str rating: int review_text: str would_recommend: bool @field_validator(‘rating’) @classmethod def validate_rating(cls, v): if not 1 <= v <= 5: raise ValueError(‘Rating must be an integer between 1 and 5’) return v def extract_json_from_llm_response(response: str) -> dict: “”“Extract JSON from LLM response that might contain extra text.”“” json_match = re.search(r‘\{.*\}’, response, re.DOTALL) if json_match: return json.loads(json_match.group()) raise ValueError(“No JSON found in response”) def parse_review(llm_output: str) -> ProductReview: “”“Safely parse and validate LLM output.”“” try: data = extract_json_from_llm_response(llm_output) review = ProductReview(**data) return review except json.JSONDecodeError as e: print(f“JSON parsing error: {e}”) raise except ValidationError as e: print(f“Validation error: {e}”) raise except Exception as e: print(f“Unexpected error: {e}”) raise This approach uses regex to find JSON within response text, handling cases where the LLM adds explanatory text before or after the data. We catch different exception types separately: JSONDecodeError for malformed JSON, ValidationError for data that doesn’t match the schema, and General exceptions for unexpected issues. The extract_json_from_llm_response function handles text cleanup while parse_review handles validation, keeping concerns separated. In production, you’d want to log these errors or retry the LLM call with an improved prompt. This example shows an LLM response with extra text that our parser handles correctly: messy_response=””‘ Here’s the review in JSON format: {

Want To Track Flights On Your iPhone Or Mac? Follow THESE Simple Steps And Things To Keep In Mind | Technology News
Track Flights Status: Imagine you’re on your way to the airport, juggling coffee in one hand and keys in the other, eager to pick up a loved one, friend, or family member. Instead of calling the airline or checking multiple websites, your iPhone or Mac quietly does the heavy lifting. Apple’s flight tracking feature allows iPhone and Mac users to check a flight’s status quickly and easily within seconds. Its smart data detectors recognize flight numbers in Messages or Search and automatically display flight times, delays, and gate information. All you need to do is type a flight number into Search or tap it in Messages to get real-time updates instantly. With this built-in tool, tracking arrivals and departures becomes simple, convenient, and effortless. Add Zee News as a Preferred Source How To Track Flights In Real-Time Via iPhone Messages Step 1: When someone sends a flight number in Messages, iOS highlights it as a clickable link. Step 2: Press and hold the highlighted flight number. Step 3: A pop-up appears showing a map with the plane’s current location. Step 4: Tap the “Preview Flight” button to see detailed flight info. Step 5: Always include the full airline name with the flight number for accuracy. How To Track Flights Using iPhone Search Step 1: Open the Search bar from the Home screen. Step 2: Enter your flight number (e.g., “IndiGo 6E2307” or “Air India AI116”). Step 3: View the flight details that appear. Step 4: Use this information to stay updated and plan your travel. How To Track Flights On Mac Step 1: Press Command + Spacebar to open Spotlight on your Mac. Step 2: Type the flight number in the search bar. Step 3: View flight details like timing, location, and gate information instantly. Step 4: To check from Messages, right-click an underlined flight number. Step 5: Select “Preview Flight” to see the same detailed flight information. Track Flights: Things To Keep In Mind To get accurate flight details, always include the airline name along with the standard two-letter airline code and flight number, such as QP1801 for Akasa Air or 6E2307 for IndiGo. This method works for both domestic and international flights and only requires an active internet connection.

Samsung Galaxy S26, S26 Plus And S26 Ultra Launch Likely On THIS Date – Expected Price, Camera, Battery & More | Technology News
Samsung Galaxy S26 Series Launch Timeline: Unlike the Samsung Galaxy S24 and S25 lineups, the Samsung Galaxy S26 series is likely to launch at the Galaxy Unpacked event in February 2026. Reports indicate that the launch event will be held in San Francisco, USA, on February 25, 2026. However, Samsung has not yet shared any official information on the launch date. Notably, the S24 and S25 lineups were launched in January 2024 and January 2025, respectively. The Samsung Galaxy S26 series will include at least three models: S26, S26 Plus and the S26 Ultra. All are expected to receive a unified camera module instead of the separate cutouts. Rumours are that the S26 Ultra might feature more rounded corners, new colour options, Snapdragon 8 Elite Gen 5 (Qualcomm’s latest flagship chipset), and several new AI features. The Galaxy S26 series is expected to continue with QHD+ AMOLED displays. All models will likely support a 120Hz refresh rate. The Samsung Galaxy S26 Ultra could feature a large 6.9-inch AMOLED screen. The display is also rumoured to include a built-in privacy feature. Add Zee News as a Preferred Source The Galaxy S26 Plus may also get a 6.9-inch AMOLED display. For comparison, the Galaxy S25 Plus has a 6.7-inch screen. The standard Galaxy S26 is expected to stick with a 6.2-inch display. Samsung may introduce some camera upgrades across the Galaxy S26 lineup. The Galaxy S26 and S26 Plus are tipped to receive a new 12-megapixel 3x telephoto camera. This would replace the older 10-megapixel sensor. The 50-megapixel main camera and 12-megapixel ultra-wide lens are likely to remain the same. The Galaxy S26 Ultra could also get an updated 12-megapixel 3x telephoto camera. The rest of its camera setup is expected to stay unchanged. This includes a 200-megapixel main sensor, a 50-megapixel ultra-wide camera and a 50-megapixel 5x telephoto lens. Battery capacity may largely stay the same. The Galaxy S26 Ultra is said to retain a 5,000mAh battery. However, it could support faster 60W charging. The Galaxy S26 Plus may continue with a 4,900mAh battery. However, the standard Galaxy S26 might pack a larger battery with 4,300mAh capacity, up from 4,000mAh on S25. Prices are expected to remain similar to last year. For reference, the Galaxy S25 was launched in India at Rs 80,999. The S25 Plus and the Galaxy S25 Ultra were priced from Rs 99,999 and Rs 1,29,999, respectively.

5 Agentic Coding Tips & Tricks
5 Agentic Coding Tips & TricksImage by Editor Introduction Agentic coding only feels “smart” when it ships correct diffs, passes tests, and leaves a paper trail you can trust. The fastest way to get there is to stop asking an agent to “build a feature” and start giving it a workflow it cannot escape. That workflow should force clarity (what changes), evidence (what passed), and containment (what it can touch). The tips below are concrete patterns you can drop into daily work with code agents, whether you are using a CLI agent, an IDE assistant, or a custom tool-using model. 1. Use A Repo Map To Prevent Blind Refactors Agents get generic when they do not understand the topology of your codebase. They default to broad refactors because they cannot reliably locate the right seams. Give the agent a repo map that is short, opinionated, and anchored in the parts that matter. Create a machine-readable snapshot of your project structure and key entry points. Keep it under a few hundred lines. Update it when major folders change. Then feed the map into the agent before any coding. Here’s a simple generator you can keep in tools/repo_map.py: from pathlib import Path INCLUDE_EXT = {“.py”, “.ts”, “.tsx”, “.go”, “.java”, “.rs”} SKIP_DIRS = {“node_modules”, “.git”, “dist”, “build”, “__pycache__”} root = Path(__file__).resolve().parents[1] lines = [] for p in sorted(root.rglob(“*”)): if any(part in SKIP_DIRS for part in p.parts): continue if p.is_file() and p.suffix in INCLUDE_EXT: rel = p.relative_to(root) lines.append(str(rel)) print(“\n”.join(lines[:600])) from pathlib import Path INCLUDE_EXT = {“.py”, “.ts”, “.tsx”, “.go”, “.java”, “.rs”} SKIP_DIRS = {“node_modules”, “.git”, “dist”, “build”, “__pycache__”} root = Path(__file__).resolve().parents[1] lines = [] for p in sorted(root.rglob(“*”)): if any(part in SKIP_DIRS for part in p.parts): continue if p.is_file() and p.suffix in INCLUDE_EXT: rel = p.relative_to(root) lines.append(str(rel)) print(“\n”.join(lines[:600])) Add a second section that names the real “hot” files, not everything. Example: Entry Points: api/server.ts (HTTP routing) core/agent.ts (planning + tool calls) core/executor.ts (command runner) packages/ui/App.tsx (frontend shell) Key Conventions: Never edit generated files in dist/ All DB writes go through db/index.ts Feature flags live in config/flags.ts This reduces the agent’s search space and stops it from “helpfully” rewriting half the repository because it got lost. 2. Force Patch-First Edits With A Diff Budget Agents derail when they edit like a human with unlimited time. Force them to behave like a disciplined contributor: propose a patch, keep it small, and explain the intent. A practical trick is a diff budget, an explicit limit on lines changed per iteration. Use a workflow like this: Agent produces a plan and a file list Agent produces a unified diff only You apply the patch Tests run Next patch only if needed If you are building your own agent loop, make sure to enforce it mechanically. Example pseudo-logic: MAX_CHANGED_LINES = 120 def count_changed_lines(unified_diff: str) -> int: return sum(1 for line in unified_diff.splitlines() if line.startswith((“+”, “-“)) and not line.startswith((“+++”, “—“))) changed = count_changed_lines(diff) if changed > MAX_CHANGED_LINES: raise ValueError(f”Diff too large: {changed} changed lines”) MAX_CHANGED_LINES = 120 def count_changed_lines(unified_diff: str) -> int: return sum(1 for line in unified_diff.splitlines() if line.startswith((“+”, “-“)) and not line.startswith((“+++”, “—“))) changed = count_changed_lines(diff) if changed > MAX_CHANGED_LINES: raise ValueError(f“Diff too large: {changed} changed lines”) For manual workflows, bake the constraint into your prompt: Output only a unified diff Hard limit: 120 changed lines total No unrelated formatting or refactors If you need more, stop and ask for a second patch Agents respond well to constraints that are measurable. “Keep it minimal” is vague. “120 changed lines” is enforceable. 3. Convert Requirements Into Executable Acceptance Tests Vague requests can prevent an agent from properly editing your spreadsheet, let alone coming up with proper code. The fastest way to make an agent concrete, regardless of its design pattern, is to translate requirements into tests before implementation. Treat tests as a contract the agent must satisfy, not a best-effort add-on. A lightweight pattern: Write a failing test that captures the feature behavior Run the test to confirm it fails for the right reason Let the agent implement until the test passes Example in Python (pytest) for a rate limiter: import time from myapp.ratelimit import SlidingWindowLimiter def test_allows_n_requests_per_window(): lim = SlidingWindowLimiter(limit=3, window_seconds=1) assert lim.allow(“u1”) assert lim.allow(“u1”) assert lim.allow(“u1”) assert not lim.allow(“u1”) time.sleep(1.05) assert lim.allow(“u1”) import time from myapp.ratelimit import SlidingWindowLimiter def test_allows_n_requests_per_window(): lim = SlidingWindowLimiter(limit=3, window_seconds=1) assert lim.allow(“u1”) assert lim.allow(“u1”) assert lim.allow(“u1”) assert not lim.allow(“u1”) time.sleep(1.05) assert lim.allow(“u1”) Now the agent has a target that is objective. If it “thinks” it is done, the test decides. Combine this with tool feedback: the agent must run the test suite and paste the command output. That one requirement kills an entire class of confident-but-wrong completions. Prompt snippet that works well: Step 1: Write or refine tests Step 2: Run tests Step 3: Implement until tests pass Always include the exact commands you ran and the final test summary. If tests fail, explain the failure in one paragraph, then patch. 4. Add A “Rubber Duck” Step To Catch Hidden Assumptions Agents make silent assumptions about data shapes, time zones, error handling, and concurrency. You can surface those assumptions with a forced “rubber duck” moment, right before coding. Ask for three things, in order: Assumptions the agent is making What could break those assumptions? How will we validate them? Keep it short and mandatory. Example: Before coding: list 5 assumptions For each: one validation step using existing code or logs If any assumption cannot be validated, ask one clarification question and stop This creates a pause that often prevents bad architectural commits. It also gives you an easy review checkpoint. If you disagree with an assumption, you can correct it before the agent writes code that bakes it in. A common win is catching data contract mismatches early. Example: the agent assumes a timestamp is ISO-8601, but the API returns epoch milliseconds. That one mismatch can cascade into “bugfix” churn. The rubber duck step flushes it out. 5.