
Access Denied You don’t have permission to access “http://zeenews.india.com/technology/vivo-y51-pro-5g-likely-to-launch-in-india-could-debut-with-7200mah-battery-military-grade-durability-check-expected-specs-price-and-launch-offers-3025802.html” on this server. Reference #18.eff43717.1773216921.69b06f22 https://errors.edgesuite.net/18.eff43717.1773216921.69b06f22
From Text to Tables: Feature Engineering with LLMs for Tabular Data
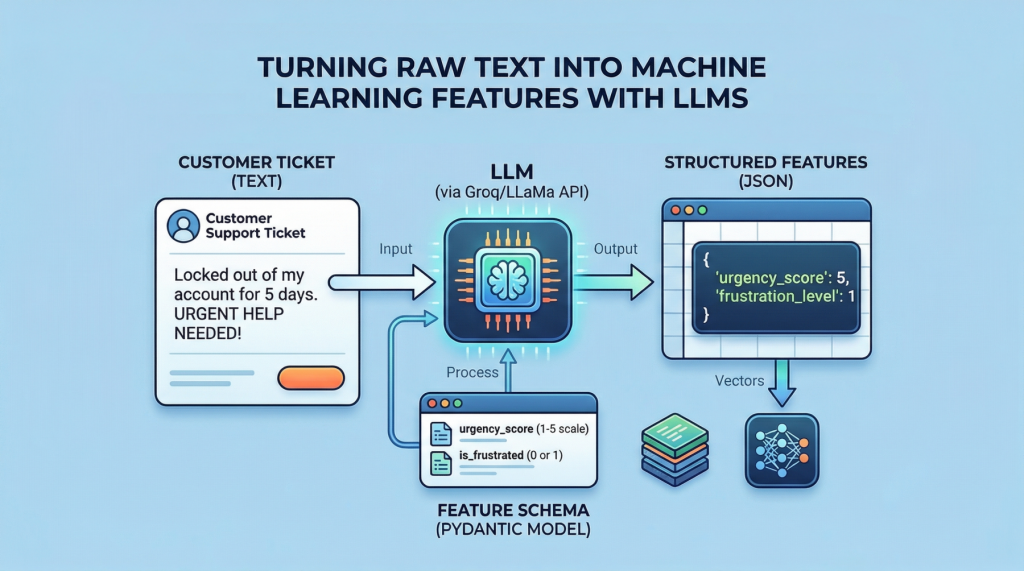
In this article, you will learn how to use a pre-trained large language model to extract structured features from text and combine them with numeric columns to train a supervised classifier. Topics we will cover include: Creating a toy dataset with mixed text and numeric fields for classification Using a Groq-hosted LLaMA model to extract JSON features from ticket text with a Pydantic schema Training and evaluating a scikit-learn classifier on the engineered tabular dataset Let’s not waste any more time. From Text to Tables: Feature Engineering with LLMs for Tabular DataImage by Editor Introduction While large language models (LLMs) are typically used for conversational purposes in use cases that revolve around natural language interactions, they can also assist with tasks like feature engineering on complex datasets. Specifically, you can leverage pre-trained LLMs from providers like Groq (for example, models from the Llama family) to undertake data transformation and preprocessing tasks, including turning unstructured data like text into fully structured, tabular data that can be used to fuel predictive machine learning models. In this article, I will guide you through the full process of applying feature engineering to structured text, turning it into tabular data suitable for a machine learning model — namely, a classifier trained on features created from text by using an LLM. Setup and Imports First, we will make all the necessary imports for this practical example: import pandas as pd import json from pydantic import BaseModel, Field from openai import OpenAI from google.colab import userdata from sklearn.ensemble import RandomForestClassifier from sklearn.model_selection import train_test_split from sklearn.metrics import classification_report from sklearn.preprocessing import StandardScaler import pandas as pd import json from pydantic import BaseModel, Field from openai import OpenAI from google.colab import userdata from sklearn.ensemble import RandomForestClassifier from sklearn.model_selection import train_test_split from sklearn.metrics import classification_report from sklearn.preprocessing import StandardScaler Note that besides common libraries for machine learning and data preprocessing like scikit-learn, we import the OpenAI class — not because we will directly use an OpenAI model, but because many LLM APIs (including Groq’s) have adopted the same interface style and specifications as OpenAI. This class therefore helps you interact with a variety of providers and access a wide range of LLMs through a single client, including Llama models via Groq, as we will see shortly. Next, we set up a Groq client to enable access to a pre-trained LLM that we can call via API for inference during execution: groq_api_key = userdata.get(‘GROQ_API_KEY’) client = OpenAI( base_url=”https://api.groq.com/openai/v1″, api_key=groq_api_key ) groq_api_key = userdata.get(‘GROQ_API_KEY’) client = OpenAI( base_url=“https://api.groq.com/openai/v1”, api_key=groq_api_key ) Important note: for the above code to work, you need to define an API secret key for Groq. In Google Colab, you can do this through the “Secrets” icon on the left-hand side bar (this icon looks like a key). Here, give your key the name ‘GROQ_API_KEY’, then register on the Groq website to get an actual key, and paste it into the value field. Creating a Toy Ticket Dataset The next step generates a synthetic, partly random toy dataset for illustrative purposes. If you have your own text dataset, feel free to adapt the code accordingly and use your own. import random import time random.seed(42) categories = [“access”, “inquiry”, “software”, “billing”, “hardware”] templates = { “access”: [ “I’ve been locked out of my account for {days} days and need urgent help!”, “I can’t log in, it keeps saying bad password.”, “Reset my access credentials immediately.”, “My 2FA isn’t working, please help me get into my account.” ], “inquiry”: [ “When will my new credit card arrive in the mail?”, “Just checking on the status of my recent order.”, “What are your business hours on weekends?”, “Can I upgrade my current plan to the premium tier?” ], “software”: [ “The app keeps crashing every time I try to view my transaction history.”, “Software bug: the submit button is greyed out.”, “Pages are loading incredibly slowly since the last update.”, “I’m getting a 500 Internal Server Error on the dashboard.” ], “billing”: [ “I need a refund for the extra charges on my bill.”, “Why was I billed twice this month?”, “Please update my payment method, the old card expired.”, “I didn’t authorize this $49.99 transaction.” ], “hardware”: [ “My hardware token is broken, I can’t log in.”, “The screen on my physical device is cracked.”, “The card reader isn’t scanning properly anymore.”, “Battery drains in 10 minutes, I need a replacement unit.” ] } data = [] for _ in range(100): cat = random.choice(categories) # Injecting a random number of days into specific templates to foster variety text = random.choice(templates[cat]).format(days=random.randint(1, 14)) data.append({ “text”: text, “account_age_days”: random.randint(1, 2000), “prior_tickets”: random.choices([0, 1, 2, 3, 4, 5], weights=[40, 30, 15, 10, 3, 2])[0], “label”: cat }) df = pd.DataFrame(data) 1 2 3 4 5 6 7 8 9 10 11 12 13 14 15 16 17 18 19 20 21 22 23 24 25 26 27 28 29 30 31 32 33 34 35 36 37 38 39 40 41 42 43 44 45 46 47 48 49 50 51 52 53 import random import time random.seed(42) categories = [“access”, “inquiry”, “software”, “billing”, “hardware”] templates = { “access”: [ “I’ve been locked out of my account for {days} days and need urgent help!”, “I can’t log in, it keeps saying bad password.”, “Reset my access credentials immediately.”, “My 2FA isn’t working, please help me get into my account.” ], “inquiry”: [ “When will my new credit card arrive in the mail?”, “Just checking on the status of my recent order.”, “What are your business hours on weekends?”, “Can I upgrade my current plan to the premium tier?” ], “software”: [ “The app keeps crashing every time I try to view my transaction history.”, “Software bug: the submit button is greyed out.”, “Pages are loading incredibly slowly since the last update.”, “I’m getting a 500 Internal Server Error on the dashboard.” ], “billing”: [ “I need a refund for the extra charges on my bill.”, “Why
Access Denied
Access Denied You don’t have permission to access “http://zeenews.india.com/technology/instagram-down-users-face-multiple-problems-messages-stuck-app-performance-issues-and-more-3025740.html” on this server. Reference #18.eff43717.1773208446.68fb999d https://errors.edgesuite.net/18.eff43717.1773208446.68fb999d
Setting Up a Google Colab AI-Assisted Coding Environment That Actually Works
In this article, you will learn how to use Google Colab’s AI-assisted coding features — especially AI prompt cells — to generate, explain, and refine Python code directly in the notebook environment. Topics we will cover include: How AI prompt cells work in Colab and where to find them A practical workflow for generating code and running it safely in executable code cells Key limitations to keep in mind and when to use the “magic wand” Gemini panel instead Let’s get on with it. Setting Up a Google Colab AI-Assisted Coding Environment That Actually WorksImage by Editor Introduction This article focuses on Google Colab, an increasingly popular, free, and accessible, cloud-based Python environment that is well-suited for prototyping data analysis workflows and experimental code before moving to production systems. Based on the latest freely available version of Google Colab at the time of writing, we adopt a step-by-step tutorial style to explore how to make effective use of its recently introduced AI-assisted coding features. Yes: Colab now incorporates tools for AI-assisted coding, such as code generation from natural language, explanations of written code, auto-completion, and smart troubleshooting. Looking into Colab’s AI-Assisted Capabilities First, we sign in to Google Colab with a Google account of our choice and click “New Notebook” to start a fresh coding workspace. The good news: all of this is done in the cloud, and all you need is a web browser (ideally Chrome); nothing needs to be installed locally. Here is the big novelty: if you are familiar with Colab, you would be familiar with its two basic types of cells: code cells, for writing and executing code; and text cells, to supplement your code with descriptions, explanations, and even embedded visuals to explain what is going on in your code. Now, there is a third type of cell, and it is not clearly identifiable at first glance: its name is the AI prompt cell. This is a brand-new, special cell type that supports direct, one-shot interaction with Google’s most powerful generative AI models from the Gemini family, and it is especially helpful for those with limited coding knowledge. Creating an AI prompt cell is simple: in the upper toolbar, right below the menus, click on the little dropdown arrow next to “Code” and select “Add AI prompt cell”. Something like this should appear in your still blank notebook. Creating an AI prompt cell to generate code from natural language Let’s give it a try by writing the following in the “Ask me anything…” textbox: Write Python code that generates 100 values for five different types of weather forecast values, and plots a histogram of these values Be patient for a few seconds, even if it seems like nothing happens at first. The AI is working on your request behind the scenes. Eventually, you may get a response from the selected Gemini model that looks like this: Taking advantage of AI prompt cells and executable code cells This new feature provides a comfortable AI-assisted coding environment that is ideal not only for code generation, but also for quick prototyping, exploring new ideas, or even making existing code more self-explanatory, e.g. by prompting the AI to insert explainable features or informative print statements in relevant parts of a program. Understanding the capabilities of this new cell type is key to leveraging Colab’s newest AI-assisted coding features correctly. A standard code cell right below each of your AI prompt cells makes for a practical symbiosis. Why? Because the output of AI prompt cells is not directly executable code, since it often comes with text descriptions before and/or after the code. Simply copy the code portion of the response and paste it into a code cell below to try it. Not everything works as expected? No problem. The AI prompt cell stays there, in its dedicated place in your notebook, so you can continue the interaction and refine your code until it fully meets your requirements. Be aware, however, of some limitations of this newly introduced cell type. Regardless of where in your notebook an AI prompt cell is located, it is not automatically aware of the content in the rest of your notebook. You will need to provide your code to an AI prompt cell in order to ask something about it. For instance, imagine we placed the previously generated code in several code cells for step-by-step execution. Then, at the bottom of the notebook, we add another AI prompt cell and ask the following: AI response when asking for code outside the AI prompt cell Notice the response: the AI is asking you to explicitly provide (paste) the code you want it to analyze, explain, and so on, no matter where that code exists in the notebook. You also cannot reference cells by identifiers like #7 or #16, nor ask something like “rewrite the third code cell in a more concise, Pythonic style“. Here is a summary of the best-practice workflow we recommend getting used to: Add AI prompt cells immediately after a cell (or small group of cells) where you expect a lot of analysis, refining, and potential changes in the code. Paste the target code and use explicit instructions with action verbs like “explain”, “refactor”, “simplify”, “add error handling”, and so on. Review and execute the results manually in a backup code cell, carefully placed depending on your data transformation workflow (it may need to go before or after the cell containing the original code). AI prompt cells are great for comfortable code-creation experimentation in the main playground, but bear in mind that for other AI-assisted tasks like explaining a piece of code in a cell or transforming it, the magic wand icon available in a code cell — which opens a Gemini tab on the right-hand side of Colab for continued interaction — is still the best and most flexible approach. Wrapping Up Google Colab is continuously releasing new AI-assisted coding features, with clear strengths but also important limitations. In this article, we
Access Denied
Access Denied You don’t have permission to access “http://zeenews.india.com/technology/vivo-x200t-full-review-dimensity-9400-zeiss-cameras-and-long-lasting-battery-check-4-pros-and-2-cons-3025716.html” on this server. Reference #18.c4f43717.1773200452.792dba8c https://errors.edgesuite.net/18.c4f43717.1773200452.792dba8c
Access Denied
Access Denied You don’t have permission to access “http://zeenews.india.com/technology/anthropic-india-and-us-parent-company-summoned-in-trademark-case-over-anthropic-name-details-3025660.html” on this server. Reference #18.c4f43717.1773156748.75f6ad5c https://errors.edgesuite.net/18.c4f43717.1773156748.75f6ad5c
Access Denied
Access Denied You don’t have permission to access “http://zeenews.india.com/technology/smartphone-battery-tip-how-to-set-charging-limit-on-android-and-iphone-for-longer-battery-backup-3025656.html” on this server. Reference #18.eff43717.1773151824.652e36f5 https://errors.edgesuite.net/18.eff43717.1773151824.652e36f5
Access Denied
Access Denied You don’t have permission to access “http://zeenews.india.com/technology/india-slimmest-flagship-android-tablet-of-2026-xiaomi-pad-8-launched-with-9200mah-battery-check-specs-and-price-3025632.html” on this server. Reference #18.eff43717.1773147995.64c8c198 https://errors.edgesuite.net/18.eff43717.1773147995.64c8c198
The 6 Best AI Agent Memory Frameworks You Should Try in 2026
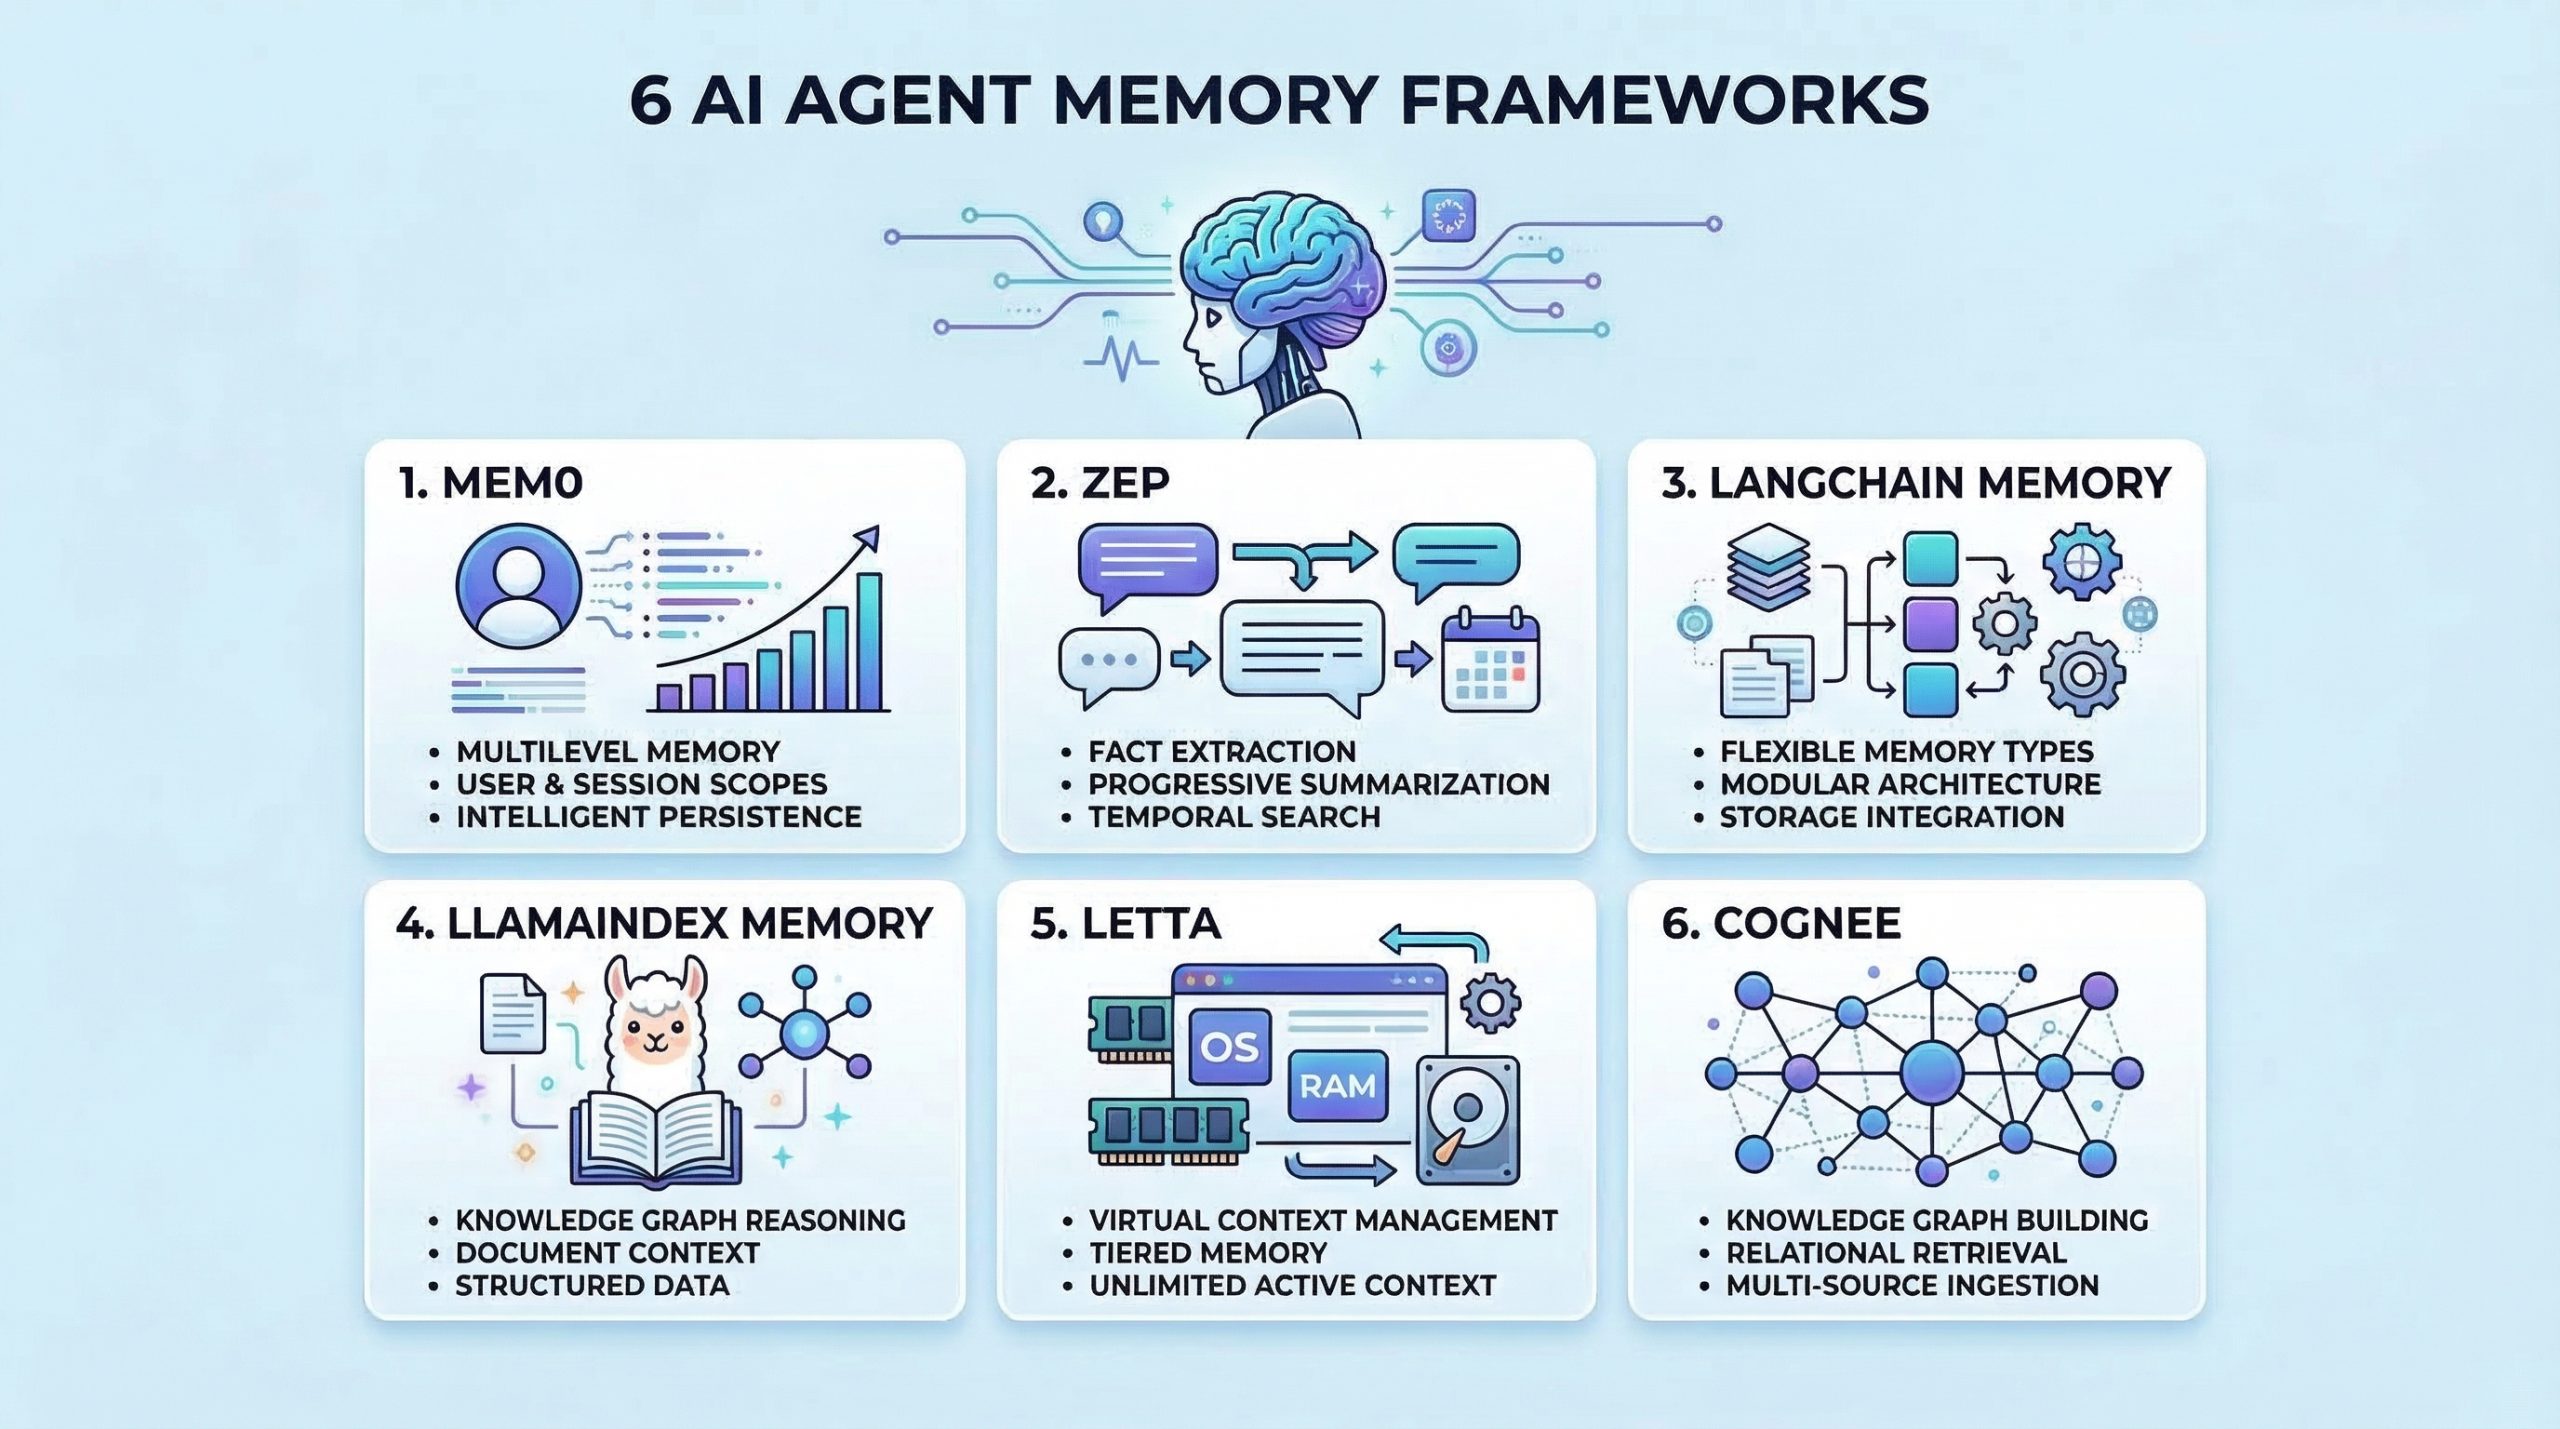
In this article, you will learn six practical frameworks you can use to give AI agents persistent memory for better context, recall, and personalization. Topics we will cover include: What “agent memory” means and why it matters for real-world assistants. Six frameworks for long-term memory, retrieval, and context management. Practical project ideas to get hands-on experience with agent memory. Let’s get right to it. The 6 Best AI Agent Memory Frameworks You Should Try in 2026Image by Editor Introduction Memory helps AI agents evolve from stateless tools into intelligent assistants that learn and adapt. Without memory, agents cannot learn from past interactions, maintain context across sessions, or build knowledge over time. Implementing effective memory systems is also complex because you need to handle storage, retrieval, summarization, and context management. As an AI engineer building agents, you need frameworks that go beyond simple conversation history. The right memory framework enables your agents to remember facts, recall past experiences, learn user preferences, and retrieve relevant context when needed. In this article, we’ll explore AI agent memory frameworks that are useful for: Storing and retrieving conversation history Managing long-term factual knowledge Implementing semantic memory search Handling context windows effectively Personalizing agent behavior based on past interactions Let’s explore each framework. ⚠️ Note: This article is not an exhaustive list, but rather an overview of top frameworks in the space, presented in no particular ranked order. 1. Mem0 Mem0 is a dedicated memory layer for AI applications that provides intelligent, personalized memory capabilities. It is designed specifically to give agents long-term memory that persists across sessions and evolves over time. Here’s why Mem0 stands out for agent memory: Extracts and stores relevant facts from conversations Provides multi-level memory supporting user-level, session-level, and agent-level memory scopes Uses vector search combined with metadata filtering for hybrid memory retrieval that is both semantic and precise Includes built-in memory management features and version control for memories Start with the Quickstart Guide to Mem0, then explore Memory Types and Memory Filters in Mem0. 2. Zep Zep is a long-term memory store designed specifically for conversational AI applications. It focuses on extracting facts, summarizing conversations, and providing relevant context to agents efficiently. What makes Zep excellent for conversational memory: Extracts entities, intents, and facts from conversations and stores them in a structured format Provides progressive summarization that condenses long conversation histories while preserving key information Offers both semantic and temporal search, allowing agents to find memories based on meaning or time Supports session management with automatic context building, providing agents with relevant memories for each interaction Start with the Quick Start Guide and then refer to the Zep Cookbook page for practical examples. 3. LangChain Memory LangChain includes a comprehensive memory module that provides various memory types and strategies for different use cases. It’s highly flexible and integrates seamlessly with the broader LangChain ecosystem. Here’s why LangChain Memory is valuable for agent applications: Offers multiple memory types including conversation buffer, summary, entity, and knowledge graph memory for different scenarios Supports memory backed by various storage options, from simple in-memory stores to vector databases and traditional databases Provides memory classes that can be easily swapped and combined to create hybrid memory systems Integrates natively with chains, agents, and other LangChain components for consistent memory handling Memory overview – Docs by LangChain has everything you need to get started. 4. LlamaIndex Memory LlamaIndex provides memory capabilities integrated with its data framework. This makes it particularly strong for agents that need to remember and reason over structured information and documents. What makes LlamaIndex Memory useful for knowledge-intensive agents: Combines chat history with document context, allowing agents to remember both conversations and referenced information Provides composable memory modules that work seamlessly with LlamaIndex’s query engines and data structures Supports memory with vector stores, enabling semantic search over past conversations and retrieved documents Handles context window management, condensing or retrieving relevant history as needed Memory in LlamaIndex is a comprehensive overview of short and long-term memory in LlamaIndex. 5. Letta Letta takes inspiration from operating systems to manage LLM context, implementing a virtual context management system that intelligently moves information between immediate context and long-term storage. It’s one of the most unique approaches to solving the memory problem for AI agents. What makes Letta work great for context management: Uses a tiered memory architecture mimicking OS memory hierarchy, with main context as RAM and external storage as disk Allows agents to control their memory through function calls for reading, writing, and archiving information Handles context window limitations by intelligently swapping information in and out of the active context Enables agents to maintain effectively unlimited memory despite fixed context window constraints, making it ideal for long-running conversational agents Intro to Letta is a good starting point. You can then look at Core Concepts and LLMs as Operating Systems: Agent Memory by DeepLearning.AI. 6. Cognee Cognee is an open-source memory and knowledge graph layer for AI applications that structures, connects, and retrieves information with precision. It is designed to give agents a dynamic, queryable understanding of data — not just stored text, but interconnected knowledge. Here’s why Cognee stands out for agent memory: Builds knowledge graphs from unstructured data, enabling agents to reason over relationships rather than only retrieve isolated facts Supports multi-source ingestion including documents, conversations, and external data, unifying memory across diverse inputs Combines graph traversal with vector search for retrieval that understands how concepts relate, not just how similar they are Includes pipelines for continuous memory updates, letting knowledge evolve as new information flows in Start with the Quickstart Guide and then move to Setup Configuration to get started. Wrapping Up The frameworks covered here provide different approaches to solving the memory challenge. To gain practical experience with agent memory, consider building some of these projects: Create a personal assistant with Mem0 that learns your preferences and recalls past conversations across sessions Build a customer service agent with Zep that remembers customer history and provides personalized support Develop a research agent with LangChain
Access Denied
Access Denied You don’t have permission to access “http://zeenews.india.com/technology/bsnl-launches-kavach-number-for-women-recharge-phones-without-sharing-personal-mobile-number-check-how-to-access-3025546.html” on this server. Reference #18.eff43717.1773135148.63e0088b https://errors.edgesuite.net/18.eff43717.1773135148.63e0088b