

import dataclasses import datasets import torch import torch.nn as nn import tqdm @dataclasses.dataclass class BertConfig: “”“Configuration for BERT model.”“” vocab_size: int = 30522 num_layers: int = 12 hidden_size: int = 768 num_heads: int = 12 dropout_prob: float = 0.1 pad_id: int = 0 max_seq_len: int = 512 num_types: int = 2 class BertBlock(nn.Module): “”“One transformer block in BERT.”“” def __init__(self, hidden_size: int, num_heads: int, dropout_prob: float): super().__init__() self.attention = nn.MultiheadAttention(hidden_size, num_heads, dropout=dropout_prob, batch_first=True) self.attn_norm = nn.LayerNorm(hidden_size) self.ff_norm = nn.LayerNorm(hidden_size) self.dropout = nn.Dropout(dropout_prob) self.feed_forward = nn.Sequential( nn.Linear(hidden_size, 4 * hidden_size), nn.GELU(), nn.Linear(4 * hidden_size, hidden_size), ) def forward(self, x: torch.Tensor, pad_mask: torch.Tensor) -> torch.Tensor: # self-attention with padding mask and post-norm attn_output, _ = self.attention(x, x, x, key_padding_mask=pad_mask) x = self.attn_norm(x + attn_output) # feed-forward with GeLU activation and post-norm ff_output = self.feed_forward(x) x = self.ff_norm(x + self.dropout(ff_output)) return x class BertPooler(nn.Module): “”“Pooler layer for BERT to process the [CLS] token output.”“” def __init__(self, hidden_size: int): super().__init__() self.dense = nn.Linear(hidden_size, hidden_size) self.activation = nn.Tanh() def forward(self, x: torch.Tensor) -> torch.Tensor: x = self.dense(x) x = self.activation(x) return x class BertModel(nn.Module): “”“Backbone of BERT model.”“” def __init__(self, config: BertConfig): super().__init__() # embedding layers self.word_embeddings = nn.Embedding(config.vocab_size, config.hidden_size, padding_idx=config.pad_id) self.type_embeddings = nn.Embedding(config.num_types, config.hidden_size) self.position_embeddings = nn.Embedding(config.max_seq_len, config.hidden_size) self.embeddings_norm = nn.LayerNorm(config.hidden_size) self.embeddings_dropout = nn.Dropout(config.dropout_prob) # transformer blocks self.blocks = nn.ModuleList([ BertBlock(config.hidden_size, config.num_heads, config.dropout_prob) for _ in range(config.num_layers) ]) # [CLS] pooler layer self.pooler = BertPooler(config.hidden_size) def forward(self, input_ids: torch.Tensor, token_type_ids: torch.Tensor, pad_id: int = 0 ) -> tuple[torch.Tensor, torch.Tensor]: # create attention mask for padding tokens pad_mask = input_ids == pad_id # convert integer tokens to embedding vectors batch_size, seq_len = input_ids.shape position_ids = torch.arange(seq_len, device=input_ids.device).unsqueeze(0) position_embeddings = self.position_embeddings(position_ids) type_embeddings = self.type_embeddings(token_type_ids) token_embeddings = self.word_embeddings(input_ids) x = token_embeddings + type_embeddings + position_embeddings x = self.embeddings_norm(x) x = self.embeddings_dropout(x) # process the sequence with transformer blocks for block in self.blocks: x = block(x, pad_mask) # pool the hidden state of the `[CLS]` token pooled_output = self.pooler(x[:, 0, :]) return x, pooled_output class BertPretrainingModel(nn.Module): def __init__(self, config: BertConfig): super().__init__() self.bert = BertModel(config) self.mlm_head = nn.Sequential( nn.Linear(config.hidden_size, config.hidden_size), nn.GELU(), nn.LayerNorm(config.hidden_size), nn.Linear(config.hidden_size, config.vocab_size), ) self.nsp_head = nn.Linear(config.hidden_size, 2) def forward(self, input_ids: torch.Tensor, token_type_ids: torch.Tensor, pad_id: int = 0 ) -> tuple[torch.Tensor, torch.Tensor]: # Process the sequence with the BERT model backbone x, pooled_output = self.bert(input_ids, token_type_ids, pad_id) # Predict the masked tokens for the MLM task and the classification for the NSP task mlm_logits = self.mlm_head(x) nsp_logits = self.nsp_head(pooled_output) return mlm_logits, nsp_logits # Training parameters epochs = 10 learning_rate = 1e–4 batch_size = 32 # Load dataset and set up dataloader dataset = datasets.Dataset.from_parquet(“wikitext-2_train_data.parquet”) def collate_fn(batch: list[dict]): “”“Custom collate function to handle variable-length sequences in dataset.”“” # always at max length: tokens, segment_ids; always singleton: is_random_next input_ids = torch.tensor([item[“tokens”] for item in batch]) token_type_ids = torch.tensor([item[“segment_ids”] for item in batch]).abs() is_random_next = torch.tensor([item[“is_random_next”] for item in batch]).to(int) # variable length: masked_positions, masked_labels masked_pos = [(idx, pos) for idx, item in enumerate(batch) for pos in item[“masked_positions”]] masked_labels = torch.tensor([label for item in batch for label in item[“masked_labels”]]) return input_ids, token_type_ids, is_random_next, masked_pos, masked_labels dataloader = torch.utils.data.DataLoader(dataset, batch_size=batch_size, shuffle=True, collate_fn=collate_fn, num_workers=8) # train the model device = torch.device(“cuda” if torch.cuda.is_available() else “cpu”) model = BertPretrainingModel(BertConfig()).to(device) model.train() optimizer = torch.optim.AdamW(model.parameters(), lr=learning_rate) scheduler = torch.optim.lr_scheduler.StepLR(optimizer, step_size=1, gamma=0.1) loss_fn = nn.CrossEntropyLoss() for epoch in range(epochs): pbar = tqdm.tqdm(dataloader, desc=f“Epoch {epoch+1}/{epochs}”) for batch in pbar: # get batched data input_ids, token_type_ids, is_random_next, masked_pos, masked_labels = batch input_ids = input_ids.to(device) token_type_ids = token_type_ids.to(device) is_random_next = is_random_next.to(device) masked_labels = masked_labels.to(device) # extract output from model mlm_logits, nsp_logits = model(input_ids, token_type_ids) # MLM loss: masked_positions is a list of tuples of (B, S), extract the # corresponding logits from tensor mlm_logits of shape (B, S, V) batch_indices, token_positions = zip(*masked_pos) mlm_logits = mlm_logits[batch_indices, token_positions] mlm_loss = loss_fn(mlm_logits, masked_labels) # Compute the loss for the NSP task nsp_loss = loss_fn(nsp_logits, is_random_next) # backward with total loss total_loss = mlm_loss + nsp_loss pbar.set_postfix(MLM=mlm_loss.item(), NSP=nsp_loss.item(), Total=total_loss.item()) optimizer.zero_grad() total_loss.backward() optimizer.step() scheduler.step() pbar.update(1) pbar.close() # Save the model torch.save(model.state_dict(), “bert_pretraining_model.pth”) torch.save(model.bert.state_dict(), “bert_model.pth”)

Apple iPhone 16, iPhone 16 Pro Max Get Massive Discount On THIS Platform; Check Camera, Battery, Display, Price And Other Specs | Technology News
Apple iPhone 16 Pro Max Flipkart Price: Flipkart’s Buy Buy 2025 sale is going to end with in couple of days. This sale is offering some of the biggest year end deals on popular gadgets. One of the best offers in this sale is on Apple’s iPhone 16 and iPhone 16 Pro Max. Flipkart is giving straight discounts, bank offers and exchange deals, which means you can get the iPhone 16 for less than Rs 40,000 if you combine all the benefits. At the same time, Flipkart is also offering a huge discount of more than Rs 10,000 on the iPhone 16 Pro Max. This makes it a great chance to buy Apple’s premium phone at a lower price than usual. These offers are not expected to stay for long, so interested buyers should make their purchase before the deals end. Apple iPhone 16 Specifications Add Zee News as a Preferred Source The premium smartphone features a 6.1 inch Super Retina XDR OLED display with HDR10 support and offers up to 1600 nits peak brightness outdoors, making the screen clear and bright even in sunlight. It runs on Apple’s A16 Bionic chipset, built on TSMC’s advanced 3nm process for faster performance and better efficiency. The phone is backed by a 3561mAh battery and comes with 8GB RAM along with 128GB or 256GB storage options. In the camera department, the iPhone 16 includes a dual camera setup with a 48MP primary sensor and a 12MP ultrawide sensor, while the front houses a 12MP camera for selfies and video calls. Apple iPhone 16 (128 GB Variant) Discount The iPhone 16 base model, which comes with 8GB RAM and 128GB storage, is now available at Apple for Rs 69,900. This is much lower than its original price of Rs 79,900, giving buyers a direct discount of Rs 10,000. With bank discounts and exchange offers, the price can drop even further, going down to around Rs 40,000. Consumers can also get a special flat discount of Rs 8,501 and choose no cost EMI options, making the deal even more affordable. If you use the exchange option, you can get up to Rs 57,400 off, making the deal even more affordable. Apple iPhone 16 Pro Max Specifcations The iPhone features a large 6.9 inch Super Retina XDR all screen OLED display with a sharp 2868×1320 pixel resolution at 460 ppi, offering bright and detailed visuals. It is powered by the A18 Pro chip, which includes a new 6 core CPU with two performance cores and four efficiency cores for smooth and powerful performance. The phone comes with a triple camera setup on the back, including a 48MP main camera with dual pixel PDAF and sensor shift OIS, a 12MP telephoto lens with 3D sensor shift OIS and 5x optical zoom, and a 48MP ultrawide camera. For selfies, it has a 12MP front camera. The device is equipped with a 4685mAh Li Ion battery that provides reliable all day usage. Apple iPhone 16 Pro Max (256 GB Variant) Discount The Apple iPhone 16 Pro Max (256 GB variant) is currently priced at Rs 1,34,900, which is Rs 10,000 lower than its original launch price of Rs 1,44,900. Buyers can also take advantage of additional bank offers, including 5 percent cashback on Axis Bank Flipkart Debit Cards (up to Rs 750) and 5 percent cashback on Flipkart SBI Credit Cards (up to Rs 4,000 per calendar quarter). The deal becomes even better with the exchange option, where users can get up to Rs 57,400 off depending on the device they trade in.
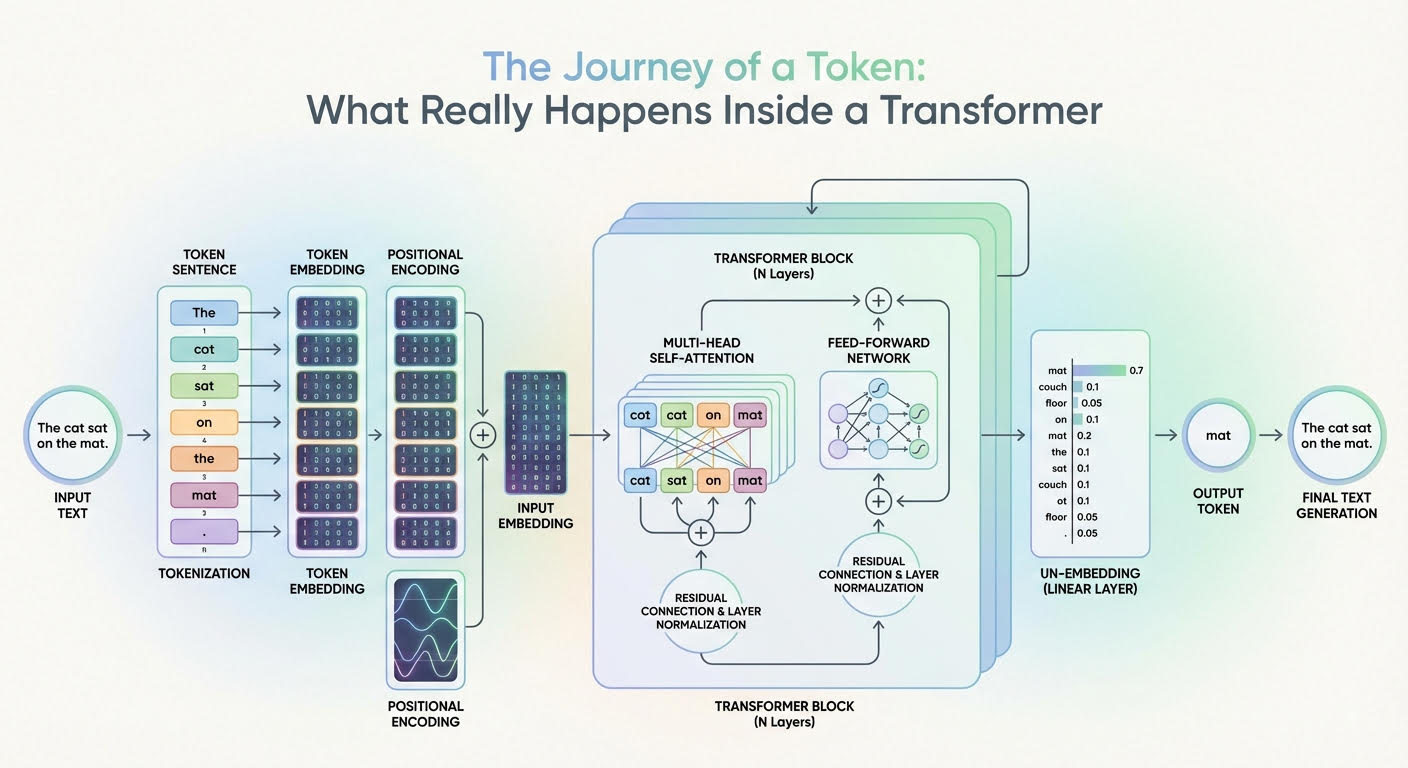
The Journey of a Token: What Really Happens Inside a Transformer
In this article, you will learn how a transformer converts input tokens into context-aware representations and, ultimately, next-token probabilities. Topics we will cover include: How tokenization, embeddings, and positional information prepare inputs What multi-headed attention and feed-forward networks contribute inside each layer How the final projection and softmax produce next-token probabilities Let’s get our journey underway. The Journey of a Token: What Really Happens Inside a Transformer (click to enlarge)Image by Editor The Journey Begins Large language models (LLMs) are based on the transformer architecture, a complex deep neural network whose input is a sequence of token embeddings. After a deep process — that looks like a parade of numerous stacked attention and feed-forward transformations — it outputs a probability distribution that indicates which token should be generated next as part of the model’s response. But how can this journey from inputs to outputs be explained for a single token in the input sequence? In this article, you will learn what happens inside a transformer model — the architecture behind LLMs — at the token level. In other words, we will see how input tokens or parts of an input text sequence turn into generated text outputs, and the rationale behind the changes and transformations that take place inside the transformer. The description of this journey through a transformer model will be guided by the above diagram that shows a generic transformer architecture and how information flows and evolves through it. Entering the Transformer: From Raw Input Text to Input Embedding Before entering the depths of the transformer model, a few transformations already happen to the text input, primarily so it is represented in a form that is fully understandable by the internal layers of the transformer. Tokenization The tokenizer is an algorithmic component typically working in symbiosis with the LLM’s transformer model. It takes the raw text sequence, e.g. the user prompt, and splits it into discrete tokens (often subword units or bytes, sometimes whole words), with each token in the source language being mapped to an identifier i. Token Embeddings There is a learned embedding table E with shape |V| × d (vocabulary size by embedding dimension). Looking up the identifiers for a sequence of length n yields an embedding matrix X with shape n × d. That is, each token identifier is mapped to a d-dimensional embedding vector that forms one row of X. Two embedding vectors will be similar to each other if they are associated with tokens that have similar meanings, e.g. king and emperor, or vice versa. Importantly, at this stage, each token embedding carries semantic and lexical information for that single token, without incorporating information about the rest of the sequence (at least not yet). Positional Encoding Before fully entering the core parts of the transformer, it is necessary to inject within each token embedding vector — i.e. inside each row of the embedding matrix X — information about the position of that token in the sequence. This is also called injecting positional information, and it is typically done with trigonometric functions like sine and cosine, although there are techniques based on learned positional embeddings as well. A nearly-residual component is summed to the previous embedding vector e_t associated with a token, as follows: \[x_t^{(0)} = e_t + p_{\text{pos}}(t)\] with p_pos(t) typically being a trigonometric-based function of the token position t in the sequence. As a result, an embedding vector that formerly encoded “what a token is” only now encodes “what the token is and where in the sequence it sits”. This is equivalent to the “input embedding” block in the above diagram. Now, time to enter the depths of the transformer and see what happens inside! Deep Inside the Transformer: From Input Embedding to Output Probabilities Let’s explain what happens to each “enriched” single-token embedding vector as it goes through one transformer layer, and then zoom out to describe what happens across the entire stack of layers. The formula \[h_t^{(0)} = x_t^{(0)}\] is used to denote a token’s representation at layer 0 (the first layer), whereas more generically we will use ht(l) to denote the token’s embedding representation at layer l. Multi-headed Attention The first major component inside each replicated layer of the transformer is the multi-headed attention. This is arguably the most influential component in the entire architecture when it comes to identifying and incorporating into each token’s representation a lot of meaningful information about its role in the entire sequence and its relationships with other tokens in the text, be it syntactic, semantic, or any other sort of linguistic relationship. Multiple heads in this so-called attention mechanism are each specialized in capturing different linguistic aspects and patterns in the token and the entire sequence it belongs to simultaneously. The result of having a token representation ht(l) (with positional information injected a priori, don’t forget!) traveling through this multi-headed attention inside a layer is a context-enriched or context-aware token representation. By using residual connections and layer normalizations across the transformer layer, newly generated vectors become stabilized blends of their own previous representations and the multi-headed attention output. This helps improve coherence throughout the entire process, which is applied repeatedly across layers. Feed-forward Neural Network Next comes something relatively less complex: a few feed-forward neural network (FFN) layers. For instance, these can be per-token multilayer perceptrons (MLPs) whose goal is to further transform and refine the token features that are gradually being learned. The main difference between the attention stage and this one is that attention mixes and incorporates, in each token representation, contextual information from across all tokens, but the FFN step is applied independently on each token, refining the contextual patterns already integrated to yield useful “knowledge” from them. These layers are also supplemented with residual connections and layer normalizations, and as a result of this process, we have at the end of a transformer layer an updated representation ht(l+1) that will become the input to the next transformer layer, thereby entering another multi-headed attention block. The whole process

iPhone 17 Series, iPhone 16, And MacBook Pro Models Get Huge Discount In Apple Holiday Season Sale- Details Here | Technology News
Apple Holiday Season Sale: As India enters the holiday season, Apple has rolled out its Holiday Season sale worldwide, including in India. The offers are now available on Apple’s official website. While direct price cuts on the newest devices are rare, customers can still save a lot through instant cashback and no-cost EMI options. Apple is offering discounts on all its products, including the latest iPhones, MacBooks, Watches, iPads, and AirPods. Adding further, banks like American Express, Axis Bank, and ICICI Bank are giving extra benefits. Shoppers can get cashback up to Rs 10,000 and enjoy no-cost EMIs for up to six months, depending on the product and the card used. To make it more lucrative for Apple users, Apple is offering 3 months of free Apple Music subscription to those who buy an Apple Watch. People can also claim Apple TV subscription of 3 months for free if you purchase an Apple device via Apple.in. Add Zee News as a Preferred Source Apple iPhone 17 Series And iPhone 16: Discount Offers The iPhone 17 series is now listed on Apple’s official website, Apple.in, with an instant cashback of Rs 5,000 on select bank cards. However, the standard iPhone 17 is out of stock on most stores, including Croma, Amazon, Flipkart, and Vijay Sales. Apple.in is still a reliable place to buy it, though it only gives Rs 1,000 as a card discount. Those who can wait may get better deals when stock increases. The iPhone 17 Pro, originally priced at Rs 1,34,900, comes with a Rs 5,000 instant discount on ICICI, American Express, and Axis Bank card users. Meanwhile, Apple also gives Rs 4,000 cashback on the iPhone 16 and iPhone 16 Plus. The other stores like Flipkart, Reliance Digital, and Vijay Sales are offering higher discounts of up to Rs 9,000. Apple MacBook Air M4, MacBook Pro M4: Discount Offers Apple’s official India website shows that the 13-inch MacBook Air M4 is available with an instant cashback of Rs 10,000. Originally priced at Rs 99,900, the effective price comes down to Rs 89,900. The same Rs 10,000 cashback is also offered on the 14-inch and 16-inch MacBook Pro models. On the other hand, the 14-inch MacBook Pro M4, launched at Rs 1,69,900, is now available for Rs 1,59,900. The 16-inch MacBook Pro M4 Pro, originally Rs 2,49,900, can now be bought for Rs 2,39,900. Apple Watch Series 11, iPad: Discount Offers The Apple Watch Series 11 is available with a Rs 4,000 bank discount, while the Apple Watch SE 3 comes with Rs 2,000 off. Both AirPods Pro 3 and AirPods 4 offer Rs 1,000 cashback. The latest iPad Air models, including the 11-inch and 13-inch versions, have a Rs 4,000 discount, while the standard iPad and iPad mini are available with Rs 3,000 off. These offers make it easier for buyers to save on Apple’s latest gadgets.

Fine-Tuning a BERT Model – MachineLearningMastery.com
import collections import dataclasses import functools import torch import torch.nn as nn import torch.optim as optim import tqdm from datasets import load_dataset from tokenizers import Tokenizer from torch import Tensor # BERT config and model defined previously @dataclasses.dataclass class BertConfig: “”“Configuration for BERT model.”“” vocab_size: int = 30522 num_layers: int = 12 hidden_size: int = 768 num_heads: int = 12 dropout_prob: float = 0.1 pad_id: int = 0 max_seq_len: int = 512 num_types: int = 2 class BertBlock(nn.Module): “”“One transformer block in BERT.”“” def __init__(self, hidden_size: int, num_heads: int, dropout_prob: float): super().__init__() self.attention = nn.MultiheadAttention(hidden_size, num_heads, dropout=dropout_prob, batch_first=True) self.attn_norm = nn.LayerNorm(hidden_size) self.ff_norm = nn.LayerNorm(hidden_size) self.dropout = nn.Dropout(dropout_prob) self.feed_forward = nn.Sequential( nn.Linear(hidden_size, 4 * hidden_size), nn.GELU(), nn.Linear(4 * hidden_size, hidden_size), ) def forward(self, x: Tensor, pad_mask: Tensor) -> Tensor: # self-attention with padding mask and post-norm attn_output, _ = self.attention(x, x, x, key_padding_mask=pad_mask) x = self.attn_norm(x + attn_output) # feed-forward with GeLU activation and post-norm ff_output = self.feed_forward(x) x = self.ff_norm(x + self.dropout(ff_output)) return x class BertPooler(nn.Module): “”“Pooler layer for BERT to process the [CLS] token output.”“” def __init__(self, hidden_size: int): super().__init__() self.dense = nn.Linear(hidden_size, hidden_size) self.activation = nn.Tanh() def forward(self, x: Tensor) -> Tensor: x = self.dense(x) x = self.activation(x) return x class BertModel(nn.Module): “”“Backbone of BERT model.”“” def __init__(self, config: BertConfig): super().__init__() # embedding layers self.word_embeddings = nn.Embedding(config.vocab_size, config.hidden_size, padding_idx=config.pad_id) self.type_embeddings = nn.Embedding(config.num_types, config.hidden_size) self.position_embeddings = nn.Embedding(config.max_seq_len, config.hidden_size) self.embeddings_norm = nn.LayerNorm(config.hidden_size) self.embeddings_dropout = nn.Dropout(config.dropout_prob) # transformer blocks self.blocks = nn.ModuleList([ BertBlock(config.hidden_size, config.num_heads, config.dropout_prob) for _ in range(config.num_layers) ]) # [CLS] pooler layer self.pooler = BertPooler(config.hidden_size) def forward(self, input_ids: Tensor, token_type_ids: Tensor, pad_id: int = 0, ) -> tuple[Tensor, Tensor]: # create attention mask for padding tokens pad_mask = input_ids == pad_id # convert integer tokens to embedding vectors batch_size, seq_len = input_ids.shape position_ids = torch.arange(seq_len, device=input_ids.device).unsqueeze(0) position_embeddings = self.position_embeddings(position_ids) type_embeddings = self.type_embeddings(token_type_ids) token_embeddings = self.word_embeddings(input_ids) x = token_embeddings + type_embeddings + position_embeddings x = self.embeddings_norm(x) x = self.embeddings_dropout(x) # process the sequence with transformer blocks for block in self.blocks: x = block(x, pad_mask) # pool the hidden state of the `[CLS]` token pooled_output = self.pooler(x[:, 0, :]) return x, pooled_output # Define new BERT model for question answering class BertForQuestionAnswering(nn.Module): “”“BERT model for SQuAD question answering.”“” def __init__(self, config: BertConfig): super().__init__() self.bert = BertModel(config) # Two outputs: start and end position logits self.qa_outputs = nn.Linear(config.hidden_size, 2) def forward(self, input_ids: Tensor, token_type_ids: Tensor, pad_id: int = 0, ) -> tuple[Tensor, Tensor]: # Get sequence output from BERT (batch_size, seq_len, hidden_size) seq_output, pooled_output = self.bert(input_ids, token_type_ids, pad_id=pad_id) # Project to start and end logits logits = self.qa_outputs(seq_output) # (batch_size, seq_len, 2) start_logits = logits[:, :, 0] # (batch_size, seq_len) end_logits = logits[:, :, 1] # (batch_size, seq_len) return start_logits, end_logits # Load SQuAD dataset for question answering dataset = load_dataset(“squad”) # Load the pretrained BERT tokenizer TOKENIZER_PATH = “wikitext-2_wordpiece.json” tokenizer = Tokenizer.from_file(TOKENIZER_PATH) # Setup collate function to tokenize question-context pairs for the model def collate(batch: list[dict], tokenizer: Tokenizer, max_len: int, ) -> tuple[Tensor, Tensor, Tensor, Tensor]: “”“Collate question-context pairs for the model.”“” cls_id = tokenizer.token_to_id(“[CLS]”) sep_id = tokenizer.token_to_id(“[SEP]”) pad_id = tokenizer.token_to_id(“[PAD]”) input_ids_list = [] token_type_ids_list = [] start_positions = [] end_positions = [] for item in batch: # Tokenize question and context question, context = item[“question”], item[“context”] question_ids = tokenizer.encode(question).ids context_ids = tokenizer.encode(context).ids # Build input: [CLS] question [SEP] context [SEP] input_ids = [cls_id, *question_ids, sep_id, *context_ids, sep_id] token_type_ids = [0] * (len(question_ids)+2) + [1] * (len(context_ids)+1) # Truncate or pad to max length if len(input_ids) > max_len: input_ids = input_ids[:max_len] token_type_ids = token_type_ids[:max_len] else: input_ids.extend([pad_id] * (max_len – len(input_ids))) token_type_ids.extend([1] * (max_len – len(token_type_ids))) # Find answer position in tokens: Answer may not be in the context start_pos = end_pos = 0 if len(item[“answers”][“text”]) > 0: answers = tokenizer.encode(item[“answers”][“text”][0]).ids # find the context offset of the answer in context_ids for i in range(len(context_ids) – len(answers) + 1): if context_ids[i:i+len(answers)] == answers: start_pos = i + len(question_ids) + 2 end_pos = start_pos + len(answers) – 1 break if end_pos >= max_len: start_pos = end_pos = 0 # answer is clipped, hence no answer input_ids_list.append(input_ids) token_type_ids_list.append(token_type_ids) start_positions.append(start_pos) end_positions.append(end_pos) input_ids_list = torch.tensor(input_ids_list) token_type_ids_list = torch.tensor(token_type_ids_list) start_positions = torch.tensor(start_positions) end_positions = torch.tensor(end_positions) return (input_ids_list, token_type_ids_list, start_positions, end_positions) batch_size = 16 max_len = 384 # Longer for Q&A to accommodate context collate_fn = functools.partial(collate, tokenizer=tokenizer, max_len=max_len) train_loader = torch.utils.data.DataLoader(dataset[“train”], batch_size=batch_size, shuffle=True, collate_fn=collate_fn) val_loader = torch.utils.data.DataLoader(dataset[“validation”], batch_size=batch_size, shuffle=False, collate_fn=collate_fn) # Create Q&A model with a pretrained foundation BERT model device = torch.device(“cuda” if torch.cuda.is_available() else “cpu”) config = BertConfig() model = BertForQuestionAnswering(config) model.to(device) model.bert.load_state_dict(torch.load(“bert_model.pth”, map_location=device)) # Training setup loss_fn = nn.CrossEntropyLoss() optimizer = optim.AdamW(model.parameters(), lr=2e–5) num_epochs = 3 for epoch in range(num_epochs): model.train() # Training with tqdm.tqdm(train_loader, desc=f“Epoch {epoch+1}/{num_epochs}”) as pbar: for batch in pbar: # get batched data input_ids, token_type_ids, start_positions, end_positions = batch input_ids = input_ids.to(device) token_type_ids = token_type_ids.to(device) start_positions = start_positions.to(device) end_positions = end_positions.to(device) # forward pass start_logits, end_logits = model(input_ids, token_type_ids) # backward pass optimizer.zero_grad() start_loss = loss_fn(start_logits, start_positions) end_loss = loss_fn(end_logits, end_positions) loss = start_loss + end_loss loss.backward() optimizer.step() # update progress bar pbar.set_postfix(loss=float(loss)) pbar.update(1) # Validation: Keep track of the average loss and accuracy model.eval() val_loss, num_matches, num_batches, num_samples = 0, 0, 0, 0 with torch.no_grad(): for batch in val_loader: # get batched data input_ids, token_type_ids, start_positions, end_positions = batch input_ids = input_ids.to(device) token_type_ids = token_type_ids.to(device) start_positions = start_positions.to(device) end_positions = end_positions.to(device) # forward pass on validation data start_logits, end_logits = model(input_ids, token_type_ids) # compute loss start_loss = loss_fn(start_logits, start_positions) end_loss = loss_fn(end_logits, end_positions) loss = start_loss + end_loss val_loss += loss.item() num_batches += 1 # compute accuracy pred_start = start_logits.argmax(dim=–1) pred_end = end_logits.argmax(dim=–1) match = (pred_start == start_positions) & (pred_end == end_positions) num_matches += match.sum().item() num_samples += len(start_positions) avg_loss = val_loss / num_batches acc = num_matches / num_samples print(f“Validation {epoch+1}/{num_epochs}: acc {acc:.4f}, avg loss {avg_loss:.4f}”) # Save the fine-tuned model torch.save(model.state_dict(), f“bert_model_squad.pth”)

How To Create Your Own 3D Caricature Using Gemini Nano Banana Pro — Check Step-By-Step Guide To The Hottest AI Trend Of 2025 | Technology News
Google’s Nano Banana Pro model has sparked a viral trend: Users are generating stylised 3D caricatures of themselves using the model. Several creators have already shared eye-catching results across social platforms, and Google has published detailed prompt guidance so anyone can try it. Prompt: A highly stylised 3D caricature of the person in the uploaded image, with expressive facial features and playful exaggeration. Rendered in a smooth, polished style with clean materials and soft ambient lighting. Bold colour background to emphasise the character’s charm and presence. Step-by-Step: Create your 3D caricature with Nano Banana Pro Add Zee News as a Preferred Source Open the Gemini app or visit the Gemini website. Sign in with your Google account — a Google AI Pro subscription is recommended for the best results. Tap the Tools icon beneath the search bar and choose Create images. Upload a clear photo of yourself, then paste the prompt (above) into the input field. Review the generated output. If you’re not satisfied, ask Gemini to refine or correct the image and re-render. Pro tip: If you’re unsure how to perfect the prompt, ask ChatGPT or another AI assistant to help you tune it for a better result. If you want to remove the Gemini watermark before sharing, you can use Qwen’s image editor and request removal of the watermark in the bottom-right corner. Why Nano Banana Pro stands out Although Nano Banana Pro is relatively new, it has quickly gained recognition as a leading image-generation and editing model. Key strengths include: Tight integration with Google Search and improved text rendering compared to earlier iterations, allowing users to generate complex visuals and infographics from simple text prompts. The ability to create hyper-realistic imagery from polished professional headshots to detailed product renders — with convincing textures and lifelike skin tones or fabrics. Many users on social media have been surprised by how closely some Nano Banana Pro outputs resemble real photographs, demonstrating the model’s strong rendering fidelity. Because of these capabilities, Nano Banana Pro is being used for both playful trends like 3D caricatures and more practical image-editing or content-creation workflows. As AI-generated visuals continue to evolve, trends like 3D caricatures showcase just how creative and accessible these tools have become. With Gemini Nano Banana Pro, users can transform simple photos into stylised, high-quality artworks in moments—opening the door to endless experimentation. Whether you’re creating content for fun, enhancing your social media presence, or exploring the latest advancements in AI imaging, this model offers a powerful and entertaining way to bring your imagination to life.

Did You Know Your Older Apple iPhones Including iPhone 16 Pro Beat iPhone 17 Pro Models In This Feature? How It Works And Check Price | Technology News
iPhone 17 Pro Max And iPhone 17 Pro Price In India: In the world of fast-paced technology, when you buy a brand new Apple iPhone, you usually expect it to have all the latest and coolest features currently going in the tech space. Everyone thinks the latest iPhone models are always better than the old ones. While software updates do bring many new features to older iPhone models, there are often a few tricks that only the newest devices can do. But here is something surprising. There is one feature that older iPhones can still do, but the newly launched iPhone 17 Pro and iPhone 17 Pro Max model cannot. That feature is taking photos in Portrait mode and Night mode at the same time. It sounds strange that a new iPhone cannot do something that older iPhones models already can. This shows that sometimes, newer is not always better in every way. iPhone 17 Pro Max And iPhone 17 Pro Models: Which Feature Is Missing Add Zee News as a Preferred Source According to TechRadar, users on Reddit and some official Apple forums have said that it is not possible to use Night mode while taking Portrait photos on the new iPhone. One Reddit user even said, “Portraits at night do not look as good as they could, and the quality is worse compared to what previous models could achieve.” MacWorld has also supported this claim. They report that an Apple Support document lists the iPhone 12 Pro through iPhone 16 Pro Max as models that can use Portrait and Night mode together, while the iPhone 17 Pro and iPhone 17 Pro Max are not included. However, it is not clear yet why Apple’s latest iPhone models aren’t able to use both Night mode and Portrait mode at the same time. After spending hefty heard-earned money, it is quite sad for the iPhone users who likes to create slightly more artistic shots in the evening. Portrait and Night Modes: How It Works in iPhone Models Portrait mode keeps the person or object in focus while softly blurring the background, giving your photos a DSLR‑style look. It uses depth data from the cameras and sensors to separate the subject from the background. You can also adjust the blur strength and choose different lighting effects, such as Natural, Studio, or Stage, either while taking the photo or later during editing. Night mode turns on automatically in dark places and shows a small yellow Night icon. It takes several photos in a short time and combines them to create a brighter and clearer picture with less grain. You can also use a slider to adjust how long the camera takes the shot, using a shorter time for quick photos or a longer time for more detail if your hands are steady. In short, Night mode on iPhones is designed to capture brighter and clearer photos in low light by using longer exposure and smart image processing. Portrait mode, on the other hand, keeps your subject sharp and artistically blurs the background using depth mapping and software. iPhone 17 Pro Max And iPhone 17 Pro Price In India The iPhone 17 Pro Max with 256 GB storage in Silver is priced at Rs 1,49,900 on Flipkart. The iPhone 17 Pro with 256 GB storage in the Cosmic Orange colour is listed at Rs 1,34,900 on Flipkart.
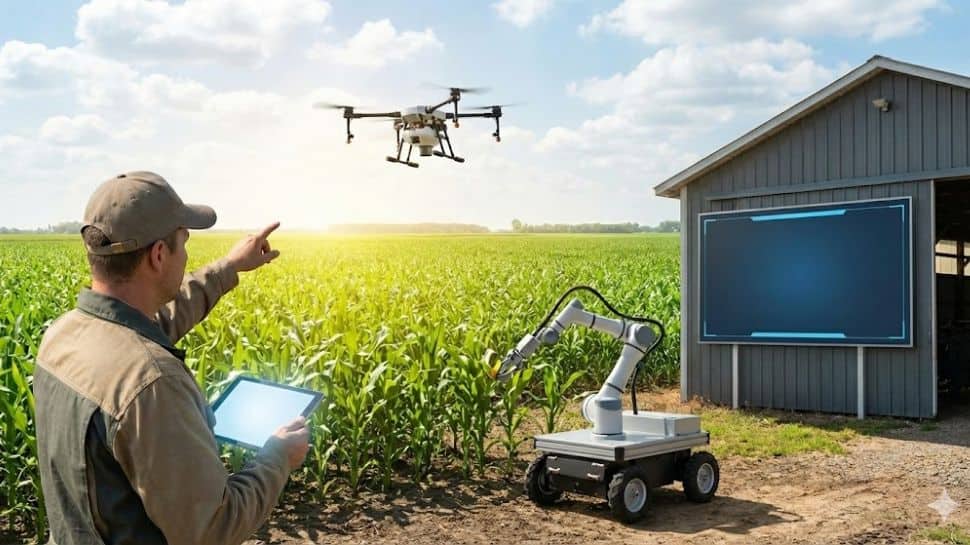
Govt Deploys AI Tools To Improve Crop Productivity, Farmer Livelihoods | Technology News
New Delhi: The government has employed Artificial Intelligence (AI) methods to improve crop productivity, sustainability and farmer livelihoods and to address various challenges in the agricultural sector. Towards this, an AI-based pilot was conducted in collaboration with the Development Innovation Lab-India on agriculturally relevant local monsoon onset forecasts across parts of 13 states for Kharif 2025. According to Minister of State for Agriculture and Farmers Welfare, Ramnath Thakur, an open-source blended model was used, including NeuralGCM, the European Centre for Medium-Range Weather Forecasts’ (ECMWF) Artificial Intelligence Forecasting System (AIFS), and historical rainfall data from 125 years from the India Meteorological Department (IMD). Add Zee News as a Preferred Source The probabilistic forecasts predicted only the local onset of the monsoon, which is essential for deciding on the date of sowing crops, said the minister in a written reply in Rajya Sabha. Local monsoon onset forecasts were sent via SMS through the M-Kisan portal to 3,88,45,214 farmers in 13states in five regional languages – Hindi, Odia, Marathi, Bangla and Punjabi. Telephonic farmer feedback surveys were conducted in Madhya Pradesh and Bihar through Kisan Call Centres after the forecasts were sent. The survey revealed that 31–52 per cent farmers adjusted their planting decisions, primarily through changes in land preparation and sowing timing, which included crop and input choice. Moreover, ‘Kisan e-Mitra’ is a voice-based AI-powered chatbot, developed to assist farmers with responses to their queries on PM Kisan Samman Nidhi scheme, PM Fasal Bima Yojna and Kisan Credit Card. This solution supports 11 regional languages and is evolving to assist with other government programs. At present, it handles over 8,000 farmer queries daily and so far, more than 93 lakh queries have been answered, according to the minister. Also, the National Pest Surveillance System utilises AI and Machine Learning to detect pest infestation in crop issues, enabling timely intervention for healthier crops. The AI tool, currently used by over 10,000 extension workers, allows farmers to capture images of pests to help them mitigate pest attacks and reduce crop losses. It supports 66 crops and over 432 pests. AI-based analytics using field photographs for satellite-based crop mapping is being used in crop-weather matching monitoring of crops sown.

YouTube ‘Recap’ Feature Launched: Check Top Trends, Podcasts, Songs, And Most-Watched Creators of 2025; Here’s How To View It | Technology News
YouTube ‘Recap’ Feature: Google-owned platform has launched the first full version of YouTube ‘Recap’ feature, a personalized shareable highlight reel that sums up everything you watched throughout the year in 2025. The company’s this move clearly aimed at taking on Apple Music Replay and Spotify Wrapped. Meanwhile, the YouTube also released its annual lists of top trends, creators, songs, and podcasts that shaped the platform in 2025. Notably, the YouTube Recap feature is currently available for users in North America, with a global rollout scheduled for later this week. YouTube added this feature after nine rounds of feedback and testing more than 50 different concepts. The new feature works across both mobile and desktop. What Is YouTube ‘Recap’ Feature? Add Zee News as a Preferred Source YouTube Recap serves as a snapshot of everything users consumed on the platform throughout 2025. Recap, according to YouTube, is basically a synopsis of your 2025 viewing habits. YouTube ‘Recap’ Feature: What’s Waiting Inside For You Users will get up to 12 cards that show their favourite channels, topics, and how their watching habits changed during the year. YouTube will also give each user a personality type based on the videos they watched. Some examples of these personality types are Sunshiner, Wonder Seeker, and Connector. Others, like Philosopher and Dreamer, are less common. Moreover, if a user watched a lot of music, their Recap will also show their Top Artists and Top Songs of the year. YouTube has also shared charts that highlight the year’s most popular creators, podcasts, and songs. (Also Read: Downloaded Sanchar Saathi? Here’s What I Found: Permissions Needed, Features, 90-Day Deadline For Apple, Samsung, OnePlus, Vivo And How To Install App) YouTube ‘Recap’ Feature: How To View It Step 1: Open YouTube on your Android phone, iPhone, or desktop. Step 2: Sign in to your YouTube account. Step 3: On the homepage, tap the ‘You’ tab. Step 4: Right below your profile details, you’ll see a banner that says “Your Recap is here.” Step 5: If you don’t see the banner, you can still view your Recap by visiting youtube.com/Recap in a browser.

Privacy Regulator Demands Coupang Re-Notify Users Of Data Breach | Technology News
Seoul: The data protection regulator here said on Wednesday that e-commerce giant Coupang Inc. did not properly notify its customers of its recent major data breach, demanding a corrected notification of a personal information “leak” from an “exposure” of such data. The Personal Information Protection Commission (PIPC) made the decision in an emergency meeting after the company said last week personal information of 33.7 million customers had been compromised, including names, addresses and phone numbers, reports Yonhap news agency. While Coupang notified affected users of the breach, the PIPC said the company merely described it as personal information being exposed when it was aware that such data had been leaked. Add Zee News as a Preferred Source The regulator said Coupang also partially omitted types of data affected while announcing the breach on its website for just one to two days. It ordered the company to notify affected customers again of the leak, advise them of data protection measures, such as changing passwords, and reinspect steps to prevent harm to customers, among other measures. It demanded Coupang submit the results of its measures within one week. “(We) will swiftly and thoroughly investigate the circumstances, scope and items of Coupang’s personal information leak, as well as violations of safety duties, and will make strict punishment if violations are found,” it said in a release. Meanwhile, the regulator said it strengthened the monitoring of illegal distribution of personal information on the internet and the dark web Sunday, which will last for three months. Coupang is facing a wave of class-action lawsuits over its massive data breach that affected nearly 34 million customers. A law firm named Chung filed the first complaint against Coupang on Monday on behalf of 14 clients, seeking 200,000 won (about US$140) per person in damages. Many other law firms have also expressed their intention to participate in the class-action lawsuits and are now recruiting participants. Considering past judicial precedents, however, the compensation awarded to users whose personal information was leaked was around 100,000 won per person, legal experts said on Wednesday.