
Access Denied You don’t have permission to access “http://zeenews.india.com/technology/does-airplane-mode-actually-stop-smartphone-radiation-the-real-answer-may-surprise-you-3053229.html” on this server. Reference #18.eff43717.1780747709.6b94f506 https://errors.edgesuite.net/18.eff43717.1780747709.6b94f506
Implementing Hybrid Semantic-Lexical Search in RAG
In this article, you will learn how to implement a hybrid search strategy for RAG systems by combining BM25 lexical search with semantic search, fused together using Reciprocal Rank Fusion. Topics we will cover include: Why hybrid search outperforms either lexical or semantic search alone in retrieval-augmented generation systems. How to implement BM25 lexical search and dense vector semantic search as independent retrieval engines in Python. How to merge both rankings using Reciprocal Rank Fusion (RRF) to produce a final, balanced retrieval result. Let’s get straight to it. Implementing Hybrid Semantic-Lexical Search in RAG Introduction Implementing hybrid search strategies is a critical step in building modern RAG (Retrieval-Augmented Generation) systems, especially when shifting from prototype to production-ready solutions. There is little argument against semantic search — fueled by dense vectors or embeddings, which are numerical representations of text — being incredibly useful at understanding semantics, synonyms, and context. However, lexical, keyword-based search with approaches like BM25 covers a small blind spot neglected by semantic search. Combining the best of both worlds is therefore the perfect recipe to take your RAG system’s retrieval mechanism the extra mile. Let’s explore how to implement such a hybrid search strategy through a gentle coding example, guiding you through every step of the process! Note: If you are unfamiliar with RAG systems, you may find the “Understanding RAG” article series remarkably insightful for getting the most out of this read. In particular, I recommend acquiring an understanding of vector databases first through this article. Step-by-Step Implementation The first step is to ensure all the necessary external Python libraries are installed, in particular these three: !pip install rank_bm25 sentence-transformers requests !pip install rank_bm25 sentence–transformers requests rank_bm25: an implementation of the BM25 lexical search algorithm for information retrieval (BM stands for “Best Matching”). sentence-transformers: provides pre-trained language models for generating text embeddings. In a real setting, you may already have your own vector database containing many document embeddings and not need this, but we will use it here to simulate the construction of a toy vector database and illustrate hybrid search on it. requests: used to fetch the raw dataset package from a public GitHub datasets repository prepared for this example. With these ingredients at hand, we start by loading the dataset and storing the raw texts in a list (we do so because it is a small dataset). import requests import zipfile import io import os # Downloading and extracting the dataset from the compressed file url = “https://github.com/gakudo-ai/open-datasets/raw/refs/heads/main/asia_documents.zip” response = requests.get(url) with zipfile.ZipFile(io.BytesIO(response.content)) as z: z.extractall(“asia_data”) # Loading documents and getting their filenames documents = [] doc_names = [] for file in os.listdir(“asia_data”): if file.endswith(“.txt”): with open(f”asia_data/{file}”, “r”, encoding=”utf-8″) as f: documents.append(f.read()) doc_names.append(file) print(f”Loaded {len(documents)} documents for the knowledge base.”) 1 2 3 4 5 6 7 8 9 10 11 12 13 14 15 16 17 18 19 20 21 import requests import zipfile import io import os # Downloading and extracting the dataset from the compressed file url = “https://github.com/gakudo-ai/open-datasets/raw/refs/heads/main/asia_documents.zip” response = requests.get(url) with zipfile.ZipFile(io.BytesIO(response.content)) as z: z.extractall(“asia_data”) # Loading documents and getting their filenames documents = [] doc_names = [] for file in os.listdir(“asia_data”): if file.endswith(“.txt”): with open(f“asia_data/{file}”, “r”, encoding=“utf-8”) as f: documents.append(f.read()) doc_names.append(file) print(f“Loaded {len(documents)} documents for the knowledge base.”) The hybrid search process is divided into three stages: two of them take place in parallel, or independently from each other. The third is where the fusion of both approaches happens, using a merging method called Reciprocal Rank Fusion (RRF). Let’s cover lexical search with BM25 first: from rank_bm25 import BM25Okapi # BM25 requires that each text is tokenized as a (sub)list of words tokenized_corpus = [doc.lower().split() for doc in documents] bm25 = BM25Okapi(tokenized_corpus) def search_bm25(query, top_k=3): tokenized_query = query.lower().split() # Getting scores (lexical relevance to the query) for all documents scores = bm25.get_scores(tokenized_query) # Ranking documents by score ranked_indices = sorted(range(len(scores)), key=lambda i: scores[i], reverse=True) return ranked_indices[:top_k], scores from rank_bm25 import BM25Okapi # BM25 requires that each text is tokenized as a (sub)list of words tokenized_corpus = [doc.lower().split() for doc in documents] bm25 = BM25Okapi(tokenized_corpus) def search_bm25(query, top_k=3): tokenized_query = query.lower().split() # Getting scores (lexical relevance to the query) for all documents scores = bm25.get_scores(tokenized_query) # Ranking documents by score ranked_indices = sorted(range(len(scores)), key=lambda i: scores[i], reverse=True) return ranked_indices[:top_k], scores The lexical search process has been encapsulated in a function called search_bm25(). This function takes two input arguments: a string containing the user’s query to the RAG system, and the number of top results to retrieve. The rank_bm25 library provides a get_scores() method that computes, for each document — treated as a collection of tokens — a lexical relevance score. We then rank documents by decreasing score, select the top-k, and return them. Meanwhile, the semantic search engine first uses a sentence transformer model to obtain embedding vectors for the texts and the user query, then applies a vector similarity metric like cosine similarity to rank texts by semantic relevance and retrieve the most relevant k: from sentence_transformers import SentenceTransformer, util import torch # Loading the pre-trained embedding model model = SentenceTransformer(‘all-MiniLM-L6-v2’) # Pre-compute embeddings for our corpus (our “Vector DB”) # You do not need this step if you already have an external vector database: # you may read and import your document vectors instead doc_embeddings = model.encode(documents, convert_to_tensor=True) def search_semantic(query, top_k=3): # Embedding the user’s query into a vector query_embedding = model.encode(query, convert_to_tensor=True) # Calculating cosine similarity between the query and all documents cosine_scores = util.cos_sim(query_embedding, doc_embeddings)[0] # Ranking documents by similarity ranked_indices = torch.argsort(cosine_scores, descending=True).tolist() return ranked_indices[:top_k], cosine_scores.tolist() 1 2 3 4 5 6 7 8 9 10 11 12 13 14 15 16 17 18 19 20 21 from sentence_transformers import SentenceTransformer, util import torch # Loading the pre-trained embedding model model = SentenceTransformer(‘all-MiniLM-L6-v2’) # Pre-compute embeddings for our corpus (our “Vector DB”) # You do not need this step if you already have
Access Denied
Access Denied You don’t have permission to access “http://zeenews.india.com/technology/instagram-posting-mistakes-5-common-errors-that-secretly-kill-creators-reach-in-2026-3053046.html” on this server. Reference #18.5cfdd417.1780707825.8ee7f8c https://errors.edgesuite.net/18.5cfdd417.1780707825.8ee7f8c
Access Denied
Access Denied You don’t have permission to access “http://zeenews.india.com/technology/motorola-edge-70-pro-vs-vivo-v70-price-camera-features-battery-which-smartphone-is-better-to-buy-3052993.html” on this server. Reference #18.eff43717.1780661349.5c56d413 https://errors.edgesuite.net/18.eff43717.1780661349.5c56d413
Access Denied
Access Denied You don’t have permission to access “http://zeenews.india.com/technology/mobile-recharge-expiry-hack-hidden-trick-to-keep-your-prepaid-sim-active-without-buying-rs-299-or-rs-399-plans-3052936.html” on this server. Reference #18.eff43717.1780650558.59a7985b https://errors.edgesuite.net/18.eff43717.1780650558.59a7985b
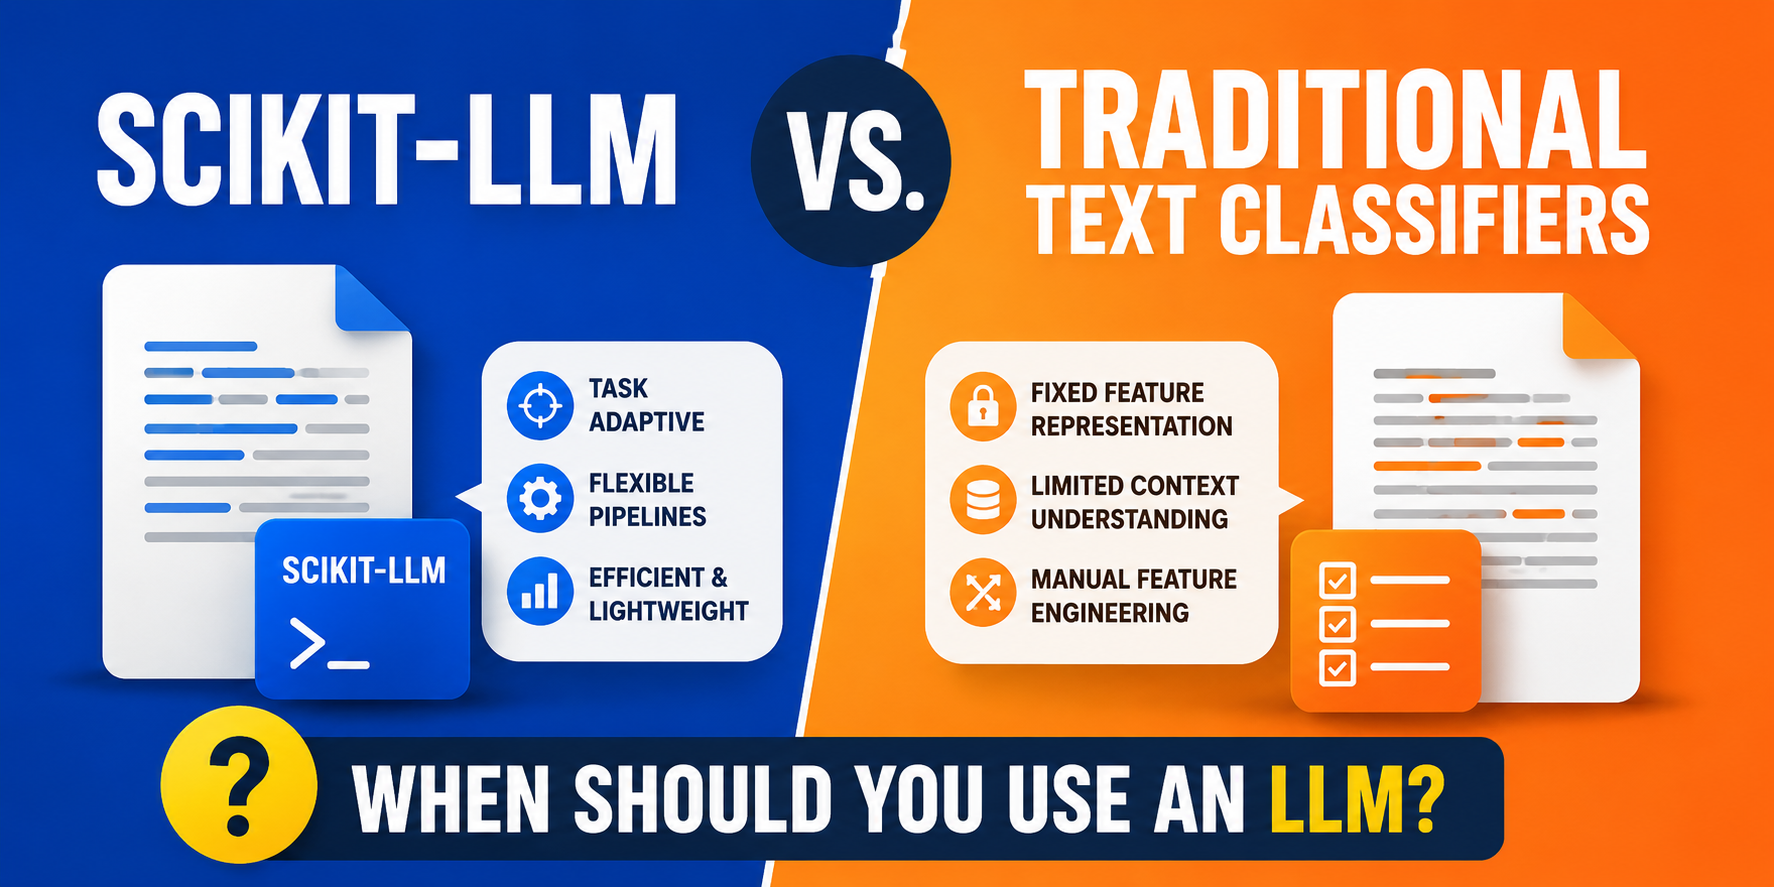
Scikit-LLM vs. Traditional Text Classifiers: When Should You Use an LLM?
In this article, you will learn how to benchmark three text classification approaches — from a classical TF-IDF pipeline to a zero-shot large language model — to understand when each is most appropriate. Topics we will cover include: How to implement and evaluate a classical TF-IDF and logistic regression text classification pipeline. How to apply zero-shot classification using a transformer-based model (BART) and compare it against the classical baseline. How to use scikit-LLM with a Groq-hosted large language model for production-ready zero-shot classification with minimal code changes. Scikit-LLM vs. Traditional Text Classifiers: When Should You Use an LLM? Introduction In recent years, generative AI models like LLMs (large language models) have gradually taken over classical machine learning ones for addressing certain tasks, for instance, text classification. But the truth is: rather than having a one-beats-all solution, there are critical trade-offs developers need to face — should we stick with fast, battle-tested conventional models, invest in fine-tuning a transformer-based LLM, or perhaps leverage LLMs’ zero-shot reasoning potential? In this article, we will implement a benchmarking between three distinct approaches for text classification: TF-IDF and logistic regression (classic baseline). Zero-shot classification with BART: a deep learning, transformer-based standard architecture. Scikit-LLM with zero-shot classification: the most modern, prompt-based approach. The tutorial below is kept entirely free for everyone to try, with no costs or API rate limits. To do so, we will use scikit-LLM alongside a model available from Groq. You will need to register at Groq and obtain an API key for evaluating the third solution below. Implementing the Benchmarking First, we install all the core libraries we will need. !pip install scikit-learn transformers scikit-llm scikit-ollama pandas torch !pip install scikit–learn transformers scikit–llm scikit–ollama pandas torch For enabling reproducibility, we create a small, synthetic dataset containing customer support messages. The tickets are categorized into five classes. Once created, we store it in a DataFrame object and split it into training and test sets. import pandas as pd from sklearn.model_selection import train_test_split data = { “text”: [ # Technical “My screen is completely black and won’t turn on.”, “The app keeps crashing every time I click save.”, “The Wi-Fi module is failing to connect to the router.”, “Data sync isn’t working across my devices.”, “My bluetooth headphones won’t pair with the app.”, “I keep getting an Error 404 on the login screen.”, “The database connection timed out during the export.”, “API rate limit exceeded even though I haven’t used it.”, “Profile images won’t load on the dashboard.”, “The software installation failed at 99%.”, # Billing “I was charged twice this month, please fix this.”, “How do I update my credit card information?”, “My invoice for last month is missing from the portal.”, “The VAT calculation on my receipt is wrong.”, “My transaction was declined but I have funds.”, “Can I change my billing cycle from monthly to annual?”, “Where can I find my official receipt?”, “My saved credit card expired and I need to swap it.”, “I was overcharged on my last statement.”, “Please remove my saved payment method.”, # Account “My account is locked and I forgot my password.”, “How do I change the email address on my profile?”, “Please delete my account and all associated data.”, “I want to update my profile picture.”, “How do I enable two-factor authentication (2FA)?”, “I didn’t receive the email verification link.”, “Can I merge two different accounts into one?”, “Is there a way to change my username?”, “I need to transfer account ownership to my manager.”, “I am locked out because I lost my 2FA phone.”, # Sales “Do you offer enterprise discounts for large teams?”, “Do you have an annual plan with a discount?”, “Can you compare the pro and basic tiers for me?”, “What is the pricing for a 50-user bulk license?”, “Is there a student discount available?”, “Can I schedule a demo with your sales team?”, “Do you sell and ship to customers in Europe?”, “How does your partner and reseller program work?”, “What are the usage limits on the free tier?”, “I need a custom quote for a government contract.”, # Refund “Can I get a refund for my last purchase? It was a mistake.”, “I want my money back for the subscription.”, “Accidental purchase, please reverse the charge.”, “I am not satisfied with the product, need a refund.”, “Cancel my subscription immediately and refund me.”, “I was charged after my free trial ended.”, “I need a prorated refund for the remaining months.”, “What is your official refund policy?”, “I was promised a refund last week but haven’t received it.”, “The item arrived broken, I want a full refund.” ], “label”: [ “Technical”] * 10 + [“Billing”] * 10 + [“Account”] * 10 + [“Sales”] * 10 + [“Refund”] * 10 } df = pd.DataFrame(data) # Stratified train-test splitting ensures all 5 categories are proportionally represented in both subsets when the dataset is small X_train, X_test, y_train, y_test = train_test_split( df[“text”], df[“label”], test_size=0.3, random_state=42, stratify=df[“label”] ) print(f”Training rows: {len(X_train)} | Testing rows: {len(X_test)}”) 1 2 3 4 5 6 7 8 9 10 11 12 13 14 15 16 17 18 19 20 21 22 23 24 25 26 27 28 29 30 31 32 33 34 35 36 37 38 39 40 41 42 43 44 45 46 47 import pandas as pd from sklearn.model_selection import train_test_split data = { “text”: [ # Technical “My screen is completely black and won’t turn on.”, “The app keeps crashing every time I click save.”, “The Wi-Fi module is failing to connect to the router.”, “Data sync isn’t working across my devices.”, “My bluetooth headphones won’t pair with the app.”, “I keep getting an Error 404 on the login screen.”, “The database connection timed out during the export.”, “API rate limit exceeded even though I haven’t used it.”, “Profile images won’t load on the dashboard.”, “The software installation failed at 99%.”, # Billing “I was charged twice this month, please fix this.”, “How do I update my credit
Access Denied
Access Denied You don’t have permission to access “http://zeenews.india.com/technology/xiaomi-17t-launched-in-india-with-leica-5x-periscope-camera-6500mah-battery-check-price-features-and-availability-3052722.html” on this server. Reference #18.54fdd417.1780618832.1893a2b2 https://errors.edgesuite.net/18.54fdd417.1780618832.1893a2b2
Access Denied
Access Denied You don’t have permission to access “http://zeenews.india.com/technology/motorola-edge-70-pro-launched-in-india-with-50mp-quad-camera-90w-fast-charging-check-price-features-and-all-3052751.html” on this server. Reference #18.c4f43717.1780576689.5ba85ada https://errors.edgesuite.net/18.c4f43717.1780576689.5ba85ada

Building a Multi-Tool Gemma 4 Agent with Error Recovery
In this article, you will learn how to transform a basic tool-calling script into a resilient agent that gracefully handles failures from misbehaving tools, malformed model outputs, and unavailable services. Topics we will cover include: How to structure an iterative agent loop with a safety cap on iteration count. The four distinct categories of failure an agent encounters when calling tools, and how to handle each one. How to design tool error messages that teach the model how to recover, reducing wasted iterations. Building a Multi-Tool Gemma 4 Agent with Error Recovery Introduction In a previous article, we wired up Gemma 4 to a handful of Python functions using Ollama’s tool-calling API. That gave us a working single-turn dispatcher: the model picks a tool, our code runs it, the model answers. It’s a useful starting point, but it’s a long way from an agent. One of the things that turns a tool-calling demo into an actual agent is how it handles things going wrong. Tools fail. The model hallucinates a function name, or passes a string where you wanted a number, or asks about a city your lookup table has never heard of. An upstream API times out. A required argument is missing. In the previous tutorial, any of these would either crash the script or get swallowed by a try/except that prints a message and gives up. That’s fine for a single path demo. It’s not fine for anything you’d want to leave running. This article rebuilds the agent around the assumption that things will go wrong, and shows how to recover gracefully when they do. The pattern is simple: catch errors at the boundary, convert them into messages the model can read, send them back to the model, and let the model decide whether to retry, route around the problem, or explain the failure to the user. We’ll also wrap everything in a proper iterative agent loop with a safety cap on iteration count. The full script can be found here. This article walks through the parts that matter. Rethinking the Tool Loop The original dispatcher ran a single round: send the user query, collect tool calls, run them, send the results back, print the model’s reply. That’s a one-shot interaction. It works fine when the model’s first response correctly answers the user’s question, but it has nowhere to go when something goes wrong. If a tool fails, the model gets one chance to react and then we’re done. If the model wants to call another tool after seeing the first result, too bad; we already exited. A proper agent loop is iterative. The structure is straightforward: Send the current message history to the model. If the model produces tool calls, execute each one, append every result to the history, and loop again. If the model produces a plain text response, that’s the final answer. Return. Cap the loop at MAX_ITERATIONS so a confused model can’t burn through your CPU forever. That last point is non-negotiable. Small models occasionally get stuck calling the same tool repeatedly, or oscillating between two tools, and there’s nothing more demoralizing than walking back to your terminal to find your laptop’s fans screaming because Gemma decided to look up the weather in London thirty times in a row. Here’s the loop: def run_agent(user_query): messages = [{“role”: “user”, “content”: user_query}] for iteration in range(1, MAX_ITERATIONS + 1): payload = { “model”: MODEL_NAME, “messages”: messages, “tools”: available_tools, “stream”: False, } print(f”[EXECUTION — iteration {iteration}]”) print(” ● Querying model…\n”) try: response_data = call_ollama(payload) except Exception as e: print(f” └─ [ERROR] Error calling Ollama API: {e}”) print(f” └─ Make sure Ollama is running and {MODEL_NAME} is pulled.”) return message = response_data.get(“message”, {}) tool_calls = message.get(“tool_calls”) or [] # Branch A: the model wants to use tools if tool_calls: print(f”[TOOL EXECUTION — {len(tool_calls)} call(s)]”) messages.append(message) tool_messages = print_tool_calls(tool_calls) messages.extend(tool_messages) print() continue # Branch B: the model produced a final answer print(“[RESPONSE]”) print(message.get(“content”, “”) + “\n”) return # Safety rail: we exhausted MAX_ITERATIONS without a final answer print(“[RESPONSE]”) print( f”Hit the {MAX_ITERATIONS}-iteration cap without a final answer. “ “This usually means the model is stuck in a tool-calling loop. “ “Try simplifying the query.\n” ) 1 2 3 4 5 6 7 8 9 10 11 12 13 14 15 16 17 18 19 20 21 22 23 24 25 26 27 28 29 30 31 32 33 34 35 36 37 38 39 40 41 42 43 44 45 def run_agent(user_query): messages = [{“role”: “user”, “content”: user_query}] for iteration in range(1, MAX_ITERATIONS + 1): payload = { “model”: MODEL_NAME, “messages”: messages, “tools”: available_tools, “stream”: False, } print(f“[EXECUTION — iteration {iteration}]”) print(” ● Querying model…\n”) try: response_data = call_ollama(payload) except Exception as e: print(f” └─ [ERROR] Error calling Ollama API: {e}”) print(f” └─ Make sure Ollama is running and {MODEL_NAME} is pulled.”) return message = response_data.get(“message”, {}) tool_calls = message.get(“tool_calls”) or [] # Branch A: the model wants to use tools if tool_calls: print(f“[TOOL EXECUTION — {len(tool_calls)} call(s)]”) messages.append(message) tool_messages = print_tool_calls(tool_calls) messages.extend(tool_messages) print() continue # Branch B: the model produced a final answer print(“[RESPONSE]”) print(message.get(“content”, “”) + “\n”) return # Safety rail: we exhausted MAX_ITERATIONS without a final answer print(“[RESPONSE]”) print( f“Hit the {MAX_ITERATIONS}-iteration cap without a final answer. “ “This usually means the model is stuck in a tool-calling loop. “ “Try simplifying the query.\n” ) The pattern is worth committing to memory because it shows up in every agent framework you’ll ever read: the message history is the state. For each iteration we send the entire conversation (the original user query, the model’s tool-call request, our tool results, any follow-up model messages) back to the model. The model is stateless; the list is the agent’s memory. This iterative structure is also what makes error recovery possible. When a tool fails and we send the error back as a tool message, the model gets to see that error and react to it on the next
Access Denied
Access Denied You don’t have permission to access “http://zeenews.india.com/technology/dark-mode-vs-light-mode-in-summer-which-saves-more-battery-and-what-s-better-for-your-smartphone-3052388.html” on this server. Reference #18.5cfdd417.1780445840.ba9efd https://errors.edgesuite.net/18.5cfdd417.1780445840.ba9efd